You will need
- - the set of probes;
- - a set of spanner wrenches and socket;
- - pliers and a tubular key.
Instruction
1
Completely cool the engine. If adjusting the valve clearances performed after the repair of the engine, setting a valve guide removed the motor. In engines with a gas distribution mechanism type SOHC gaps is regulated by the screws located at the ends of the rocker arms.
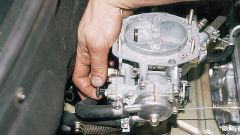
2
Unscrew nuts of fastening of a cover of a motor kuternoga type or threaded opening in the cylinder head of the engine with the transmission. Valves set to top dead center of end of compression stroke. To do this, locate the special marks on the sprocket of the timing chain and cylinder head.
3
By cranking the crankshaft of the power unit, align these marks. The crankshaft rotate a tubular key mounted on the nut of the generator rotor. To get to this nut of a large screwdriver, Unscrew the plug on the cover of the generator (moped motors) or remove the fan casing (skaterny motors). Pre-remove the spark plug.
4
Rotate the crankshaft until the full alignment of the timing marks on the cylinder head and on the sprocket. Check the placing of the valves in the position of the upper dead point. To do this, rotate the crankshaft in hand. The rocker valve must be stationary and have a small gap (free play). Flat probes set the exact size of thermal gaps.
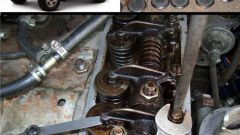
5
Alternately, insert feeler gauges of different thicknesses into the gap between the valve tip and the adjusting screw installed on the yoke. If necessary, bend the probes. If the probe enters into the gap with little effort, and the next size feeler gauge into this gap is not included, consider the size of the gap equal to the thickness of the first probe. In most engines of 50 CC. cm clearance should be 0.05 mm unless other data is specified in the instruction manual.
6
To change the size of the gap hold the screw head with a wrench or pliers. At the same time loosen the lock nut. Inserting into the gap the right feeler gauge, rotate the adjusting screw until the weak pinching of the probe. Then hold the probe in place, tighten the lock nut. The adjusting screw while lock from offset pliers or wrench.
7
Then be sure to check the correct installation of the thermal gap. In reverse order, install all previously disassembled parts.