Instruction
1
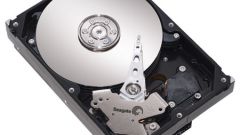
Unplug the hard drive.
2
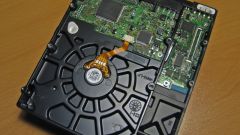
Find the PCB of the drive chip that controls the engine (either directly or through the transistor switches).
3
Took a magnifying glass and a flashlight, correctly rewrite the marking of this chip.
4
Type in the search engine following line: chipname datasheet where chipname - chip mark.
5
Look at the data sheet for the chip output called SPNENAB, spindle enable or similar.
6
Carefully (this may require a miniature soldering iron, tweezers, a flashlight and a magnifying glass) disconnect the corresponding output circuits from the printed track.
7
Take a resistor of 1 kilo Ohm. Thin insulated conductors (in order not to damage the Board and chip) attach the sealed-off output through this resistor to the supply line +5 V. Exclude the possibility of any short circuits.
8
Post on hard drive nutrition in the normal way. Make sure the engine never stops, even if you keep it on for fifteen minutes or more.
9
If you need to turn the engine hard drive separately from the housing, remove the PCB, motor and drives. By unscrewing the screws holding the engine, you may need to power. Desolder the ribbon cable that connects the charge with the engine, then replace it with a set of regular wires. Leave the wiring the same as it was when using the train. Fix the engine and pay the way you want. If you need to feed the circuit with a single voltage of 12 V, we get a second, equal 5 V with 7805 stabilizer mounted on the heat sink and augmented with a blocking capacitor.
10
Once you have achieved engine speed without stopping, come up with a method for its use. On the Internet there are descriptions of the various devices that use such engines: low-power tools, electronic clock, using the strobe effect, etc.
Note
Use caution when handling strong neodymium magnet of the linear drive moving the heads.