Instruction
1
You need to open "start menu". Open "My computer". In the left column, click "View system information" in the tab "Hardware" select "device Manager". You have to open a menu containing all the installed devices. Next, select "Disk drives", click the right mouse button on hard not activated and open the menu "Properties". In the section "device Status" will need to activate your hard disk. Such a situation is possible when the hard disk is activated, but cannot continue working because of outdated drivers. In this case, select "Update driver" in the options of the hard disk. You will see "found new hardware Wizard", where you can choose to download the driver from Internet or use the disc that came with the operating system.
2
If the hard drive is still not visible, open the start menu, select "control Panel" in the menu, open "administrative tools", then in the tab "computer Management" select "disk Management". Just right click on the drive that is not displayed, select "Properties" in the menu "Equipment", then "applications" and "Enable". In this section you can rename the disk, specify a different path, format, or delete a logical drive.
3
If the disc is included, but not displayed, go to the BIOS menu. Basic subsystem I/o (Basic Input Output System, BIOS) are stored in a small chip flash memory on the motherboard. During startup of the computer CPU on the motherboard executes the BIOS program for the initial test and hardware initialization, then passes control to the operating system.
4
To enter the program when you turn on the computer press the DEL key to open the menu. Navigation in the program by using the arrow keys and the Ent and Esc. Open the MAIN menu (or Standard CMOS Setup depends on the version of the program), open the sub-menu Secondary Ide Slave not activated, select the hard drive and turn it on. To complete the work with the BIOS and save the settings press F10 or select the main menu item "Save & Exit Setup". To return default settings, select Load File-Safe Defaults.
Useful advice
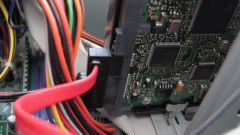
In that case, if the disk is not displayed after the above actions, you need to check that it was installed correctly (connected 40-pin ribbon cable to the IDE cable) and perform actions again.