You will need
- • Fabric and accessories for sewing skirts
- • The tape
- • Line
- • Sewing pins and needles
- • Scissors
- • Tailor's chalk
- • Sewing machine
- • Iron
Instruction
1
Measuring tape remove the 2 measurements:
1. FROM the waist size. The tape should be placed exactly on the waist line.
2. DI — the length of the product. This measure is removed from the waist line to the intended bottom of the skirt.
During the measurements, the tape should not SAG or be severely stretched. For ease of measuring the length of the skirt you can tie the waist band. You can also take the help of another person. the results of the measurements record. You have to make some calculations.
2
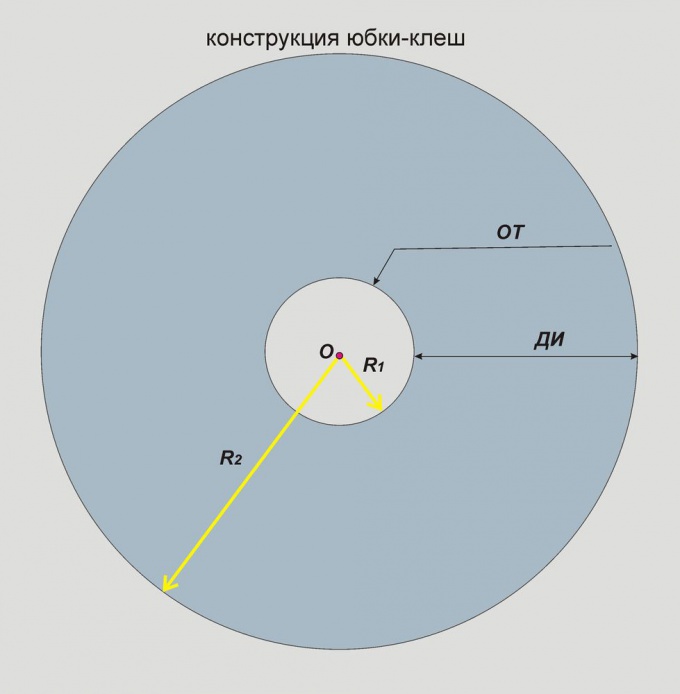
Pattern skirt-flared is a design of two circles, where the smaller radius R1 – a waist circumference of greater radius R2 – length skirt + R1. Note that in the calculation of tissue must be taken into consideration that the skirt needs to be at least one seam for the zipper, if your model is not gathered on an elastic band.
3
Now you need to make some calculations. Only first determine which skirt design isflared , you should choose: with one seam, two seams or three. Consider the easiest way: the skirt isflared with two side seams.
We will not go deeply into the theory of geometric computation, we need only recall the formula for the circumference of a circle L = 2?R, where L acts as the waist, huh ? – known number of equal 3,14159265.... Assume that the volume measured waist is 70 cm From the computed radius of the circle thus:
FROM = 2?R1,
R1 = /2?, i.e. R1 = 70/6,2832 = 11,141 cm...
The radius of the larger circle is calculated simply: the skirt length (DI) added to the value of the smaller radius R1.
For example, skirt length 60 cm
On this basis, R2 = 11,141+60 = 71,141...cm
These calculations are necessary for the construction of the pattern of the skirt isflared
4
Now, when finished all the calculations, draw a pattern on tracing paper or paper.
Take a sheet of tracing paper or paper thus, to get a square with a side equal to R2. From any corner of the place both sides cut 2 equal to R1, mark them with a pencil. From this angle, continue to defer the segments R1 and R2, leaving stroke marks on the paper. Leave the finishing touches at such a distance from each other, then it was easy to connect them with a smooth arc line. Connect the strokes of the two standards a smooth line so that they looked just like ? circles with radii R1 and R2. Cut the pattern exactly on the lines. Unfold the paper pattern is ready.
Take a sheet of tracing paper or paper thus, to get a square with a side equal to R2. From any corner of the place both sides cut 2 equal to R1, mark them with a pencil. From this angle, continue to defer the segments R1 and R2, leaving stroke marks on the paper. Leave the finishing touches at such a distance from each other, then it was easy to connect them with a smooth arc line. Connect the strokes of the two standards a smooth line so that they looked just like ? circles with radii R1 and R2. Cut the pattern exactly on the lines. Unfold the paper pattern is ready.
5
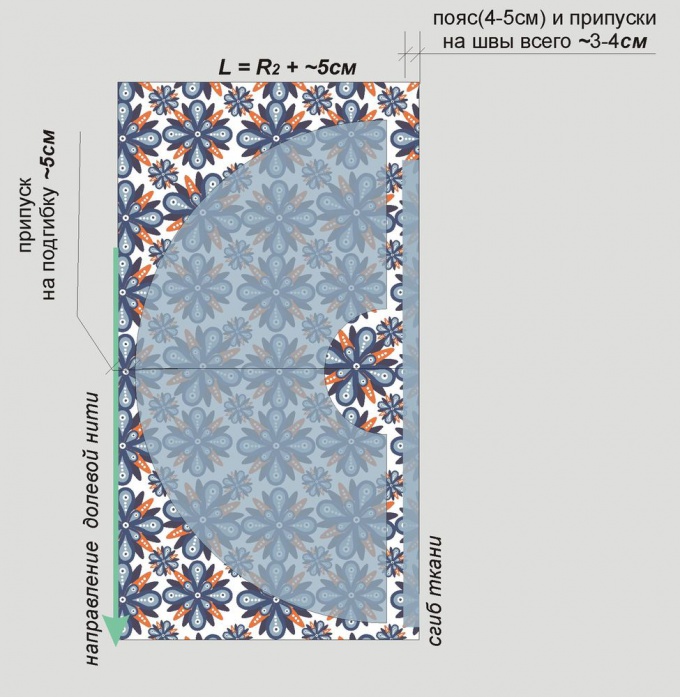
When choosing fabrics at the store pay attention to its width. If fabric width is not less than 2R2 +~ 15cm (on the hem and allowances), it will allow you to cut out the skirt, folded the fabric in half in the direction of the grain lines. Thus, you save time on cutting and the money to buy fabric.
If you want to select and calculate the amount of fabric you were not difficult to construct a pattern skirtsflared at home on paper in the form of two semicircles (without taking into account allowances for seams and the hem) and take with you to the store. It is unlikely the store will deny you, if you want to put them directly on the fabric. So you can easily Orient in the layout of the patterns and save on fabric consumption.
If you want to select and calculate the amount of fabric you were not difficult to construct a pattern skirtsflared at home on paper in the form of two semicircles (without taking into account allowances for seams and the hem) and take with you to the store. It is unlikely the store will deny you, if you want to put them directly on the fabric. So you can easily Orient in the layout of the patterns and save on fabric consumption.
6
Before you reveal some fabrics need to be treated with steam or moistened and dried, the finished product shrinking.
For cutting wide fabric fold it in half in the direction of the grain lines face down Option of cutting skirts-flared , provided that the width of the fabric more than 2R2 + ~ 15cm offered on the illustrations for step. Pattern pin to pin and draw through it a straight line of chalk. The line of the seam (1-1. 5 cm) and allowances on the hem of the bottom (4-5cm) draw a dotted line. Leave room for the pattern belt.
For cutting wide fabric fold it in half in the direction of the grain lines face down Option of cutting skirts-flared , provided that the width of the fabric more than 2R2 + ~ 15cm offered on the illustrations for step. Pattern pin to pin and draw through it a straight line of chalk. The line of the seam (1-1. 5 cm) and allowances on the hem of the bottom (4-5cm) draw a dotted line. Leave room for the pattern belt.
7
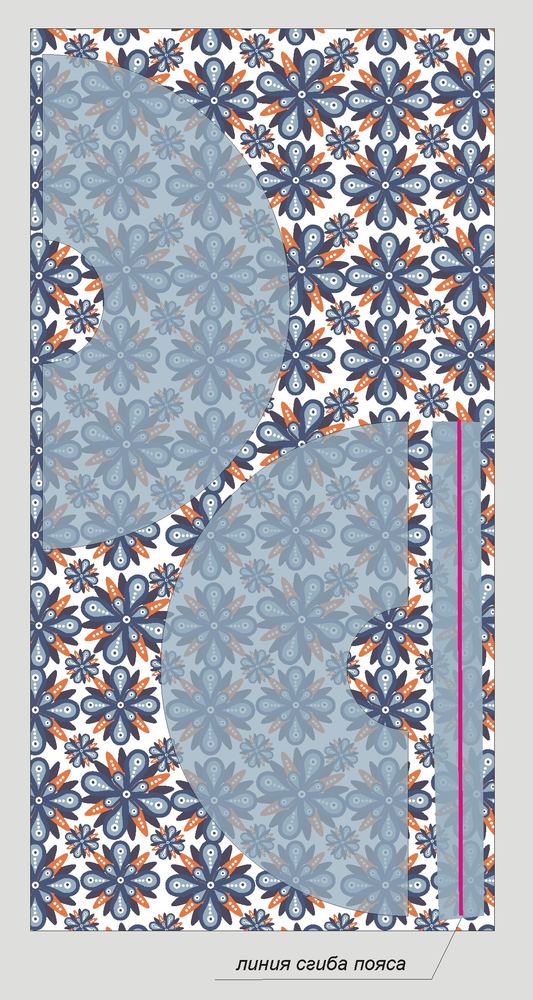
If the width of the fabric allows you to place the pattern of the skirt the previous method, then place them in mirror order on the canvas, laid out entirely. This can be duplicate of the paper one more detail of skirt or draw both in turn.
The option of cutting the skirtflared , provided that the width of the fabric less than two lengths skirt +~ 10cm is shown in figure below.
The option of cutting the skirtflared , provided that the width of the fabric less than two lengths skirt +~ 10cm is shown in figure below.
8
From the remaining fabric it is necessary to find the belt in the direction of the grain lines. Estimate in advance the location on the fabric. Belt size: 2 width, because it should be to sew folded in half. The length of the belt equal to the amount of your waist + 0.5-1cm free fit + 4-6cm for a button closure or a hook. Put the obtained distances on the fabric and draw a line of the rectangle. Don't forget to set aside a dotted line the seam of the belt width and along the length of 1-1,5 cm on both sides.
9
Cutting the details of the skirt with scissors strictly by the dotted lines of the seam and hem the bottom.
Sew the skirt seams along the lines of primaqiune zipper asutuste their iron. Vsheyte zipper.
Sew the skirt seams along the lines of primaqiune zipper asutuste their iron. Vsheyte zipper.
10
Adhesive fabric for corsages cut a strip equal to twice the folded belt. Priutyuzhte it to the underside of the belt with a damp cloth or steam. The belt will astrocyte laterally and turn there. Fold the waistband in half and iron. Before pritachivajut belt slightly pripasayte skirt at the waist with a wide seam with stitch. Also you can do it manually straight stitch and slightly pull the thread. Skirt pripojeni waist sits perfectly on the figure. Baste the front side belt (the one to which the interlining is glued to the skirt and sew the seam. Do not allow even small folds in the stitching. Pristrochite inner side of the belt by any suitable fabric for this method.
11
Will pripasayte edge hem skirt hand stitch or machine stitch wide. Baste the hem inside out and priutyuzhte iron with steam generator. Check twisted it somewhere in the bottom line. Now you can sew the hem by any suitable method (manually hidden seam, machine stitching a straight seam or Poggibonsi).
Make a loop at the waistband, sew a button.
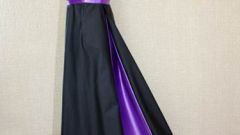
Outwrite product. Fashionable skirt for all occasions ready!
Make a loop at the waistband, sew a button.
Outwrite product. Fashionable skirt for all occasions ready!