You will need
- cloth;
- - materials for sewing;
- - basics of cutting and sewing.
Instruction
1
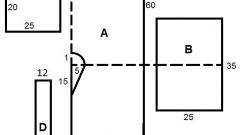
Sewing kimono start with the cut parts. The first step is to cut back, which is a rectangular shape. The front part is the same rectangle, cut into two equal halves. On the back, cut the neck, the diameter of which is equal to poluobhvat neck. The sleeves also have a rectangular shape, as a rule, the width of each liner should be 75 cm for an adult. Choose the length in accordance with the physical parameters of the person considering the fact that during training the sleeve is prevented.
2
Next, sew the two front halves to the back line from neck to edge of shoulder. Sew the sleeves so that the seam on the sleeve is aligned with the previous seam. The prepared sleeve in the form of a folded pipe in half to sew the back and front parts from the edge of the shoulder to the bottom line. Similarly it is necessary to sew the second sleeve.
3
The next step is sewing the extensions on the front strap and on the neckline. Extension to the front pieces are rectangles, and on the neck – a triangle. At this stage it is advisable to treat open seams that allow the fabric to crumble.
4
Take manufacturing belt. Width womens belt is a cloth cut length of 6 meters and a width of 60 cm After treatment is a 30-inch waist. Unisex belt in finished form should be width of 10 cm and a length of about two meters.
Note
It should be noted that a kimono may vary side smell. For example, the classic kind of smell left, for the funeral procession, the smell needs to be right. This corresponds to the established principles of the Eastern peoples.
Useful advice
For the manufacture of kimonos, choose special fabrics (e.g. silk). But training is fine cotton fabrics which are easy to process and easy to use.


