You will need
- Adobe Photoshop, photography
Instruction
1
Press L. On the toolbar civitarese window where you can choose one of the tools of the group Lasso.
2
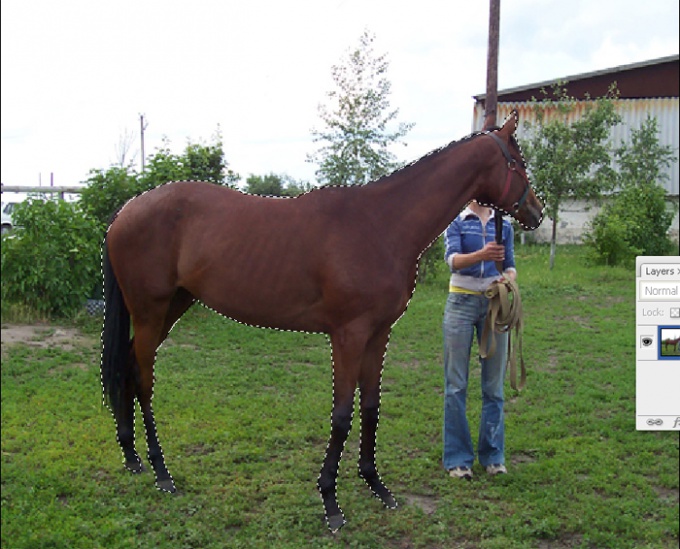
The Polygonal Lasso ideal for highlighting objects with broken paths. With the help of Lasso Tool object is allocated manually. Hover the cursor over the object's outline, press left mouse button and, without releasing, drag the entire object. When the circuit is closed, release the key object will be highlighted. If by mistake you select the unnecessary area, press the Backspace key to undo the wrong actions.
3
Magnetic Lasso analyzes the difference in color of the basic outline and background and how to "stick" to the silhouette of the object. In the properties pane, specify the following parameters:
- Feather – blur the selection, in pixels
- Width – the width of the strip which will analyze a tool to distinguish the object from the background
- Edge Contrast – the difference in color tone between the subject and the background, in percent
- Frequency – the frequency at which the tool will "cling" to the image.
4
Hover the cursor over the object and press left mouse button to set the instrument to the initial data. Then release the key and drive the cursor on the contour. If some part of the colors of the background and object are very close, again hover over the object and press the left key to set the new parameters. If checked was part of the background, press the Backspace key to undo erroneous steps. To complete the process, double-click the left mouse button.
5
Another method of separating the object – quick mask mode. Press Q and select the button " Edit in Quick Mask Mode. Foreground color and background color on the tools palette should be installed by default, to do this, press D. Select a hard brush and begin to paint over the object in the image. If you have captured extra footage, swap the black and white squares on the toolbar and a white brush will remove the mask. After you paint over the entire object, again click on the Q key – this way you will return to the standard mode. Highlighted will be all the image around your object. In the main menu, choose Select and Inverse. After that, the selection will move to the object.
6
After you have identified the part of the image one way or another, you need to save it in a memory buffer. If you want to remove a fragment from an image, press Ctrl+X or from the main menu choose the Edit points and Cut. If you just want to copy the object, use Ctrl+V – the image will not change, and in the program memory will retain a copy of the selection.
If required, open a new image and paste there the copied object with Ctrl+C.
If required, open a new image and paste there the copied object with Ctrl+C.