You will need
- Transistor П416
- The variable resistor 47 kOhm
- Resistor 10 kOhm
- 2 capacitors 0,022 MF
- Capacitor 0,033 MF
- Capacitor 4700 pF
- A capacitor of 100 pF
- Capacitor 33 pF
- Capacitor 51 pF
- 2 trimmer capacitor, 4-15 pF
- Choke (L2) 20-60 mcg
- Carbon microphone
- High-impedance phones (headphones)
- Telescopic antenna
- 40 cm of copper wire 0.5 mm
- Battery power for 9-12 In
- Switch ( SA1) — 2 position for 2 groups of contacts (double toggle)
- A piece of Micarta or PCB for mounting panel
- Mounting wire
- The power switch (not shown in the diagram)
- Toy radio
- Tools
- Soldering iron
- Clippers
- Pliers
- Tweezers
- Drill
- Drill
Instruction
1
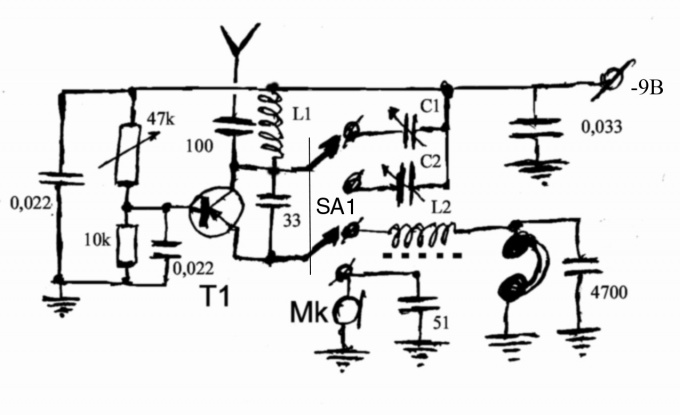
Assemble the parts according to the scheme. Adjust coil L1 for the range 27 to 30 MHz. Its winding data are as follows: 11 coils of about 0.5 mm is wound on a disc with a diameter of 10 mm. fine tuning range is carried out with trimming capacitors C1 (receive mode) and C2 (transfer mode) given the fact that the diagram of the switch SA1 is in the receive mode. The adjusting range is held at the reference receiver (for example, child radioprogramm device fabricated). This is easiest to do in a transmission mode. Switching the switch in receive mode, until a loud hiss in the headphones, adjusting the mode of the transistor a variable resistor.
2
Without touching the coil L1 and trimmer capacitor C1 until you get a good signal reception control transmitter (of the same child radios). If you make a walkie-talkie instead of a spoiled, customize it according to available.
3
The housing design can be any, it depends on the dimensions of the parts. If the casing is metal, the antenna must be protected from contact with the housing of a reliable insulator. As insulator can be used plexiglass.
Note
The component values marked on the diagram
It is advisable to collect 2 similar radios.
Sometimes for reliable operation of the radio station you want to pick up the transistor by replacing it.
It is advisable to collect 2 similar radios.
Sometimes for reliable operation of the radio station you want to pick up the transistor by replacing it.
Useful advice
Instead of the telescopic antenna can use a piece of stiff copper wire or copper tube. The length of the wire or tube is 0.5 m.
Installation of the radio is performed on the circuit Board of dielectric material. It can be printed and mounted. Perhaps the use of three-dimensional mounting.
Tuning the radio is held in connected and fully extended the antenna. During the configuration and operation of the radio is not to touch the antenna with your hands.
In the diagram, the applied high frequency transistor structure p-n-p, but it can be replaced by any other low-power RF, including the structure of the n-p-n, for example KT315. In this case, you must reverse the polarity of the power source reversed.