Instruction
1
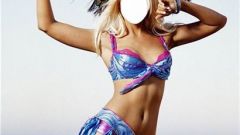
Open the photo for editing in Photoshop. Click Select and choose Color range. Opens the preferences window – click on the colored object pictures that you want to highlight.
2
Adjust the Color range settings, until you see the allocation of a fragment of a photo completely – for example, if you want to leave colored neckerchief or dress, make sure that these fragments have been fully allocated. Click OK.
3
Create a new layer (Create new layer) and paste to a layer vector mask. On the vector mask you see above was created in a Color range selection, which is separated from the main part of the photo when editing, remained unchanged.
4
Go to the bottom layer and apply the gradient. To do this, open the Image menu, select Adjustments, and then in the list select Gradient map.
5
In the Gradient options check the value Reverse, and set a smooth gradient from black to white. Click OK and view the changes on the picture.
6
Increase its scale to study on the subject of unnecessary color fragments – in addition to highlighted in the beginning of the fragment, similar hue could have other photography, so they could get to a selection vector mask.
7
To get rid of excess color fragments and make them as the other, black and white, take the eraser tool (Eraser tool) and in the layer mask to erase unwanted parts of the selection.