Instruction
1
Surgery to change the color of the technologically divided into two stages:
- first of all, you need some way to isolate the part of the image that will be subjected to color adjustment
- secondly, it is, in fact, the operation of changing the color characteristics of the chosen fragment.
In the Arsenal of Adobe Photoshop there are over a dozen different tools that you can use in one way or another affect the color of the image. Some of them have a built-in system of automatic selection of the zone of influence, the other implies that the fragment is already allocated in advance.
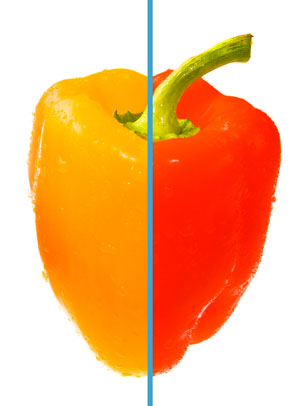
It is often necessary to adjust the color of specific regions of the spectrum. For example, all the yellow tones in the picture needs to be brighter, or areas with blue-green shades should be just green, etc.
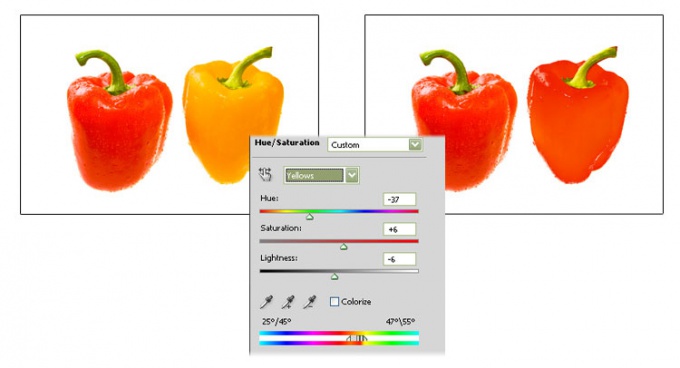
To perform such operations, you can use the most simple and popular function Hue/Saturation (Hue/Saturation). In modern versions of photoshop it is implemented in two forms. First, can one-time to apply it to the image. (menu Image>Adjustments> Hue/Saturation) And secondly, you can create an adjustment layer that will carry the same function. (menu Layers>New Adjustment Layer> Hue/Saturation feature of the second embodiment is that the parameters of the created layer can be modified any number of times, achieving the best result. In the first case, the transform of the original image is performed with the set parameters once and for all. The necessary method is selected from the specific context: if you have a complex multi-stage work on color correction, it is better to create one, and then a few adjustment layers.
Whichever options you choose, the settings Hue/Saturation are the same. In the top of the list is selected spectral range, which will be changes – the default is the standard choice of six primary colors. Engines under it sets the law changes the color of selected areas. The first parameter is responsible for the tonal shift of the second color intensity, the third for its brightness.
Below, for two spectral bands clearly shows how will be a modification of the spectrum in the picture. If you look closely, on the top of these two spectral lines have a small additional engines, into which you can fine-tune the color area to which you will apply the effect.
Instead of Hue/Saturation, similarly you can apply the function of Selective Color (it is also implemented in the form of an adjustment layer and as one-time command that is next in the same menu). A list of spectral ranges in it like that. Otherwise the mechanism of color change – does the engine settings are responsible for the individual color channels. Sometimes it is more convenient than the mechanism of the Hue/Saturation.
- first of all, you need some way to isolate the part of the image that will be subjected to color adjustment
- secondly, it is, in fact, the operation of changing the color characteristics of the chosen fragment.
In the Arsenal of Adobe Photoshop there are over a dozen different tools that you can use in one way or another affect the color of the image. Some of them have a built-in system of automatic selection of the zone of influence, the other implies that the fragment is already allocated in advance.
It is often necessary to adjust the color of specific regions of the spectrum. For example, all the yellow tones in the picture needs to be brighter, or areas with blue-green shades should be just green, etc.
To perform such operations, you can use the most simple and popular function Hue/Saturation (Hue/Saturation). In modern versions of photoshop it is implemented in two forms. First, can one-time to apply it to the image. (menu Image>Adjustments> Hue/Saturation) And secondly, you can create an adjustment layer that will carry the same function. (menu Layers>New Adjustment Layer> Hue/Saturation feature of the second embodiment is that the parameters of the created layer can be modified any number of times, achieving the best result. In the first case, the transform of the original image is performed with the set parameters once and for all. The necessary method is selected from the specific context: if you have a complex multi-stage work on color correction, it is better to create one, and then a few adjustment layers.
Whichever options you choose, the settings Hue/Saturation are the same. In the top of the list is selected spectral range, which will be changes – the default is the standard choice of six primary colors. Engines under it sets the law changes the color of selected areas. The first parameter is responsible for the tonal shift of the second color intensity, the third for its brightness.
Below, for two spectral bands clearly shows how will be a modification of the spectrum in the picture. If you look closely, on the top of these two spectral lines have a small additional engines, into which you can fine-tune the color area to which you will apply the effect.
Instead of Hue/Saturation, similarly you can apply the function of Selective Color (it is also implemented in the form of an adjustment layer and as one-time command that is next in the same menu). A list of spectral ranges in it like that. Otherwise the mechanism of color change – does the engine settings are responsible for the individual color channels. Sometimes it is more convenient than the mechanism of the Hue/Saturation.
2
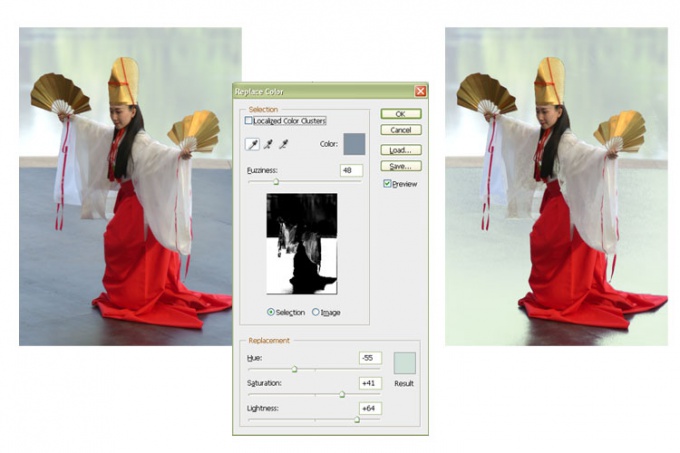
In addition, if you need to specify a specific color, the area which needs to be repainted, you can use Replace Color (Replace color). It is available via the menu Image>Adjustments> Replace Color. At the top of the displayed working window there is a field of choice where tool, eyedropper you can use as a sample of a specific color point in the image. You can extend the range by adding more points or on the contrary to specify the color by subtracting unwanted shades – for this there is respectively adding and subtracting a pointer-pipette. On a small black-and-white box you can control how the selected colors are painted in white color, but areas which will not affect conversion – black. Your task is to get in this window, clear the mask that meets your expectations about what will be painted.
At the bottom of the work window are already familiar settings Hue/Saturation. With them and create a new color.
At the bottom of the work window are already familiar settings Hue/Saturation. With them and create a new color.
3
However, most often not need to repaint any color tone in General, but the specific area of the image. Then the phase selection and phase correction must be implemented on the queue.
To select the image in photoshop also has a variety of tools.
If the contour plot has clear boundaries, and it is easy to imagine as a broken curve, you can use the Polygonal Lasso tool. It encircles the perimeter of the desired area. With the closure of the polyline, boundaries of the selection begins to flicker. This means that any transform function that we apply now, will only affect the area that we have identified.
Now you can change the color of the selected fragment. For example, you will use the same Hue/Saturation. Now, however, in the drop-down list is nothing to choose – the choice is already made. By default, it is set to Master, that is, the conversion will relate to the full spectrum. You can adjust the color relative to the original, or "paint" the whole area one color tone by placing a tick in the box to Colorize. However, three of the engine will ask the same for the whole area of the color shade.
Of course, the necessary area of the image can be distinguished not only with the Lasso tool, but also a variety of other ways: for example, automatically adapts the picture tools Magic Wand and Quick Selection Tool. You can go the other way and ideologically to create a selection not on the basis of closed contours, and a black and white mask superimposed on the image. For this there is the mask editing mode (switch to it and back by pressing the Q key or the corresponding icon in the bottom toolbar). Now the mask can be, for example, paint brush, constructed from geometric primitives, etc.

4
The program features a wide, studying them, you'll broaden your experience, achieving more and better results. Experiment, try, for example, to use other features of Adobe Photoshop to change the color Balance, Variations, Photo Filter, etc. from the Image menu>Adjustments, each of which has its specific algorithm of color correction, necessary and convenient to accomplish the various tasks of the color change.
Note
What version of photoshop do you use? Select the area you want to change, in this case, we will change the color of the blouse at the girl. Select the polygonal Lasso tool. For ease of selection, increase the up to about 800%, and begin to highlight the area which you wish to change the color.
Useful advice
You only have to change the blending option from "Normal" ("Normal") to "Color" ("Color") to have the eyes look natural (picture bottom right) and the color changed. If the shade or color do not like, you can always choose another, or to adjust the current in the right pane by moving the sliders. Thus it is possible to achieve a more natural result, without making all the manipulations again. In this article, we considered two options to change eye color in photoshop.