You will need
- - screwdriver;
- - new parts for replacement.
Instruction
1
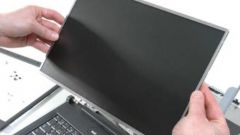
Unscrew all the fastening of the screen to the body of the laptop, remove the bezel from the monitor. Please note that some models of the mounting of the screen elements in order to improve the appearance of put different plugs. Locate the ribbon cable leading to the motherboard, make sure it was attached to the monitor properly, because often he is the cause of image problems. Also, make sure the machine is in good condition.
2
If the problem is not connecting the loops and not in the lamps, find the inverter, located at the bottom of the screen. Lift up to disconnect the high voltage wire that connects the motherboard and the led illuminator. Put a new inverter to replace the old, assemble the laptop in reverse order.
3
If cause of failure is failure of the backlight, then remove the tape connecting the bottom part of the matrix and the lamp cable of the screen. Disconnect the panel of the decoder, located at the bottom of the screen – here be extremely careful not to damage the trains, otherwise all your repairs will end up buying a completely new matrix. After that, remove the filters, and then, holding the base of the wire, disconnect it from the old backlight lamp.
4
Before you seal the bulb in a new place, be sure to check her condition – this will allow you once again not to jeopardize the safety of your matrix. If the part works properly, set it in place.
5
Assemble the monitor. For the convenience of the repair matrix, it is recommended that all spare parts seized in the process of the monitor screen, put in the order of their parsing. Do not forget about caution – the design of the parts are fragile and one wrong move can cost you huge costs of purchasing new.
Note
Repair of monitors is strongly recommended to trust professionals – new to this case may even aggravate the situation, because all the parts are rather fragile structure.
Useful advice
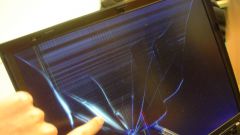
Note the behavior of the monitor when switched on. If you turn a few seconds it fades, the reason for this likely failure of the inverter. If the deterioration of the operation of the monitor are expressed in the darkening of the picture in some places, the image takes on a pink or red tint, then it's the backlight.