You will need
- An empty cartridge, compatible ink, syringe with a volume of 5-10 milliliters, rubber gloves, napkins.
Instruction
1
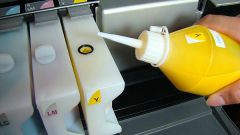
Place the cartridge, nozzles down. Gently peel off the protective sticker. Under the label you will find five holes. Important only the hole, which is located in the middle.
2
Fill the syringe compatible with your printer ink element. If the cartridge is completely empty, you will need 5 milliliters of the pigment. Gently begin to insert the needle into the middle hole, vertically. During the introduction you will feel slight resistance, this is absolutely normal. After the needle has rested in no case do not continue to push it with force, otherwise you risk damaging the filter element, which is located at the bottom of the cartridge. Now slightly lift the needle up.
3
Start slowly inject the ink. The slower you do it, the better. Then gently remove the needle of the printing element and glue in place of the old sticker.
4
Place the cartridge on a damp cloth for 10 minutes, then gently wipe with a soft cloth the print surface. The cartridge is filled with! Before printing, run the cleaning procedure and alignment cartridge standard software for your printer.
Note
Not to smeared ink the whole procedure of filling produce in rubber medical gloves. Cover the workplace with old Newspapers. If you poured into the cartridge of excess ink, carefully siphon it with a syringe.
Useful advice
If the cartridge has dried up, place the print surface in warm water to a depth of 5-7 mm and allow to soak for 2-3 hours.. Try to refill an empty cartridge immediately!