You will need
- Guitar
- A Capo
- Tuning fork
- Learn to play the guitar
- Table of chords and tabs
- Player and recording songs
Instruction
1
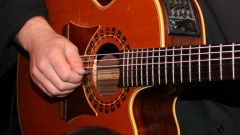
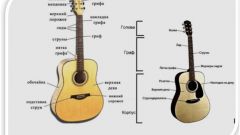
Memorize the guitar part. The housing in which is cut a circle of socket, called a resonator. The cavity has a top, bottom and side deck. Ribs, on which the upper and lower decks are connected with side are called shells. The guitar is the neck is a narrow Board, on which the strings. It is located on the nut — metal strips. The distance between the strips are called frets. The numbering of the frets comes from the head of the neck, which is fixed splitting. If you twist the pin in one direction or another, the sound of the strings will change. Pick and roll look, in which case the sound becomes thinner(above) and a rough(below). The numbering of the strings begins with a very thin, it is called first.
2
Learn the numbering of fingers. On the left hand index is denoted by the number 1, middle — 2, ring — 3, pinky — 4. In notes they are usually referred to by numbers. The fingers of the right hand are marked in the notes with dots or strokes. One point is denoted by the thumb, two index, three middle, and four unnamed.
3
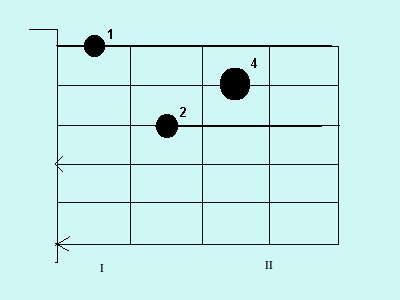
Take the tuning fork. If it is an ordinary tuning fork with a mustache, he makes the sound "La". This sound must match the sound of the first string, sandwiched on the fifth fret. The fifth fret on the fretboard is usually marked with a dot. All strings six-string guitar, except the third, set up by the fifth fret. That is the second string, sandwiched on the fifth fret should match the open first string. The third string is clamped at the fourth fret and should match open the second.
4
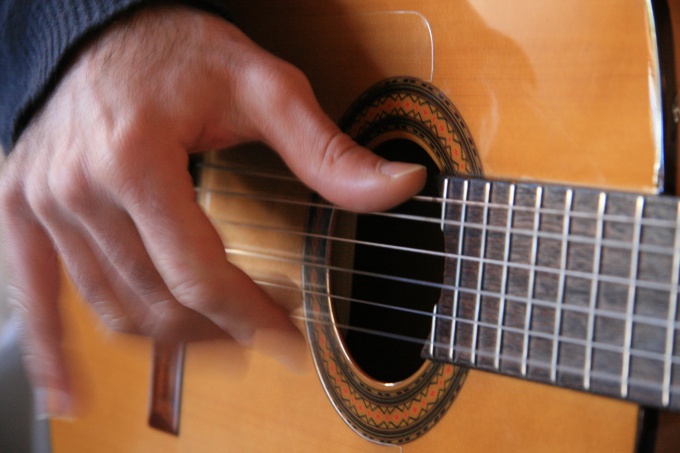
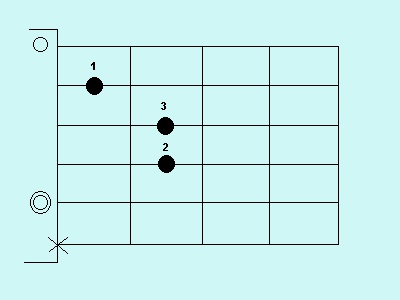
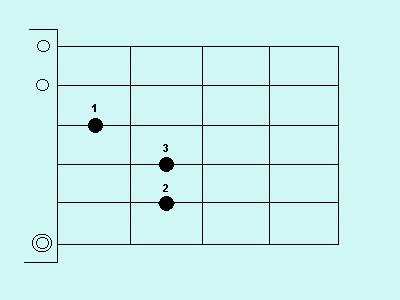
Take the chord chart and tablature. Try to take the first chord. Usually start with the chord a minor. Hold the index finger of the left hand of the second string on the first fret and the middle and ring respectively, the third and fourth strings on the third fret. Clamping the strings are tight, but the arm needs to move freely. Right-hand iterate over the strings in front of the outlet. When you learn how to take the first chord of more or less confidently, wear on the neck the Capo and try to take the chords in the same position on different frets. Remember the letter symbols of notes and chords. Note La is indicated by letters. The same symbol and a chord in minor. Further designations are on the Latin alphabet - the letter b is denoted by a, b-flat, C-and so on. The sound si is indicated by the letter h.
5
Look in the table and will learn two more chords — d minor and e major. Knowing three chords, you can already try to play some simple song. That better be a song in waltz rhythm, since it is possible to play too much.
6
Learn the fight. The thumb of the right hand hits the fifth or sixth string, and the rest stacked together (but not clamped) 1,2,3 and 4 strings. Ensure that the hand was free.
7
Try to make a Barre. While the index finger of the left hand rests on one of the frets across all or several strings, and the fingers clamped a particular chord. Start small Barre. When performing this technique, the index finger clamps three or four strings. When a large Barre the index finger holds all the strings. Try doing a Barre on different frets. After mastering this technique you will be able to play songs in any key using the same finger positions of the left hand. More difficult techniques to master for the tutorial.
Note
Seven-string guitar is configured not as a six-string. The first string gives the sound "re" of the first octave. The second chord you need to hold down on the third fret, that she also gave the sound "re". Open second string gives the sound of "si". The third string is clamped at the fourth fret, and the fourth to the fifth. They provide the sounds "salt" and "re".The fifth string is clamped at the third fret sixth to fourth, seventh to fifth. Open 5, 6 and 7 strings provide the sounds "si", "salt" and "re".
Tuning forks come in different types. Some give several sounds, including the "mi" of the first octave. It was he needed to tune the first string.
You must cut the nails on his left hand so that the string clamping fingertips. The nails of the right hand, you should have long because some of the techniques of sound production is designed for long nails.
Do not try to learn how to play immediately. Do little every day. Do not worry if on the left hand will be corn.
Useful advice
If no tuning fork, but is, for example, a home telephone, you can use the following method. Lift the handset and listen for a dial tone. Usually it corresponds to the sound "mi" of the first octave.
Those who have that bad hearing, do not despair. The guitar can be set up and the purely "physical way". This will require a small piece of paper. Configure the first string on the tuning fork. Then bend the paper piece and put it on the first string. The second string while hold down on the third fret and pull. If the frequency coincides paper will go on the string.
In parallel with the development of chords learn in the tutorial notes.
While the fingers are still not strong enough, use a Capo. As soon as you feel that you have a good take chords, learn to take Barre.