You will need
- Adobe Photoshop and suitable photo.
Instruction
1
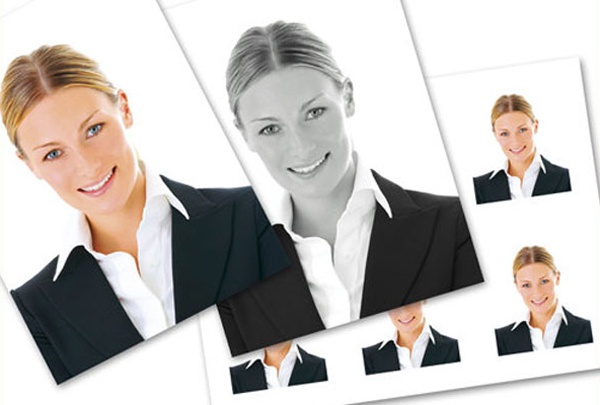
Select or take a picture of the person you want the photo on documents, on a plain light background. Between the top and the top edge of the photo must be a distance. End photo should somewhere at chest level. Shoulders should be in the frame, but no visible arms. Open the photo in Adobe Photoshop. Edit: make color correction, obestochte if necessary. In any case don't change appearance (eye color, width of nose, size and shape of the face, etc.).
2
Crop the crop tool if necessary, photos to left. In menu Image-image Size (not to be confused with canvas size), change the settings for the print size to 3x4 see Nothing wrong, if there is a small deviation, for example 3x3,96 see If the proportions are too far from necessary, click "Cancel" and again the "Frame" tweak the photo. You can then go back to editing the image size. Make sure the resolution was 300 pixels/inch. Photo ready.
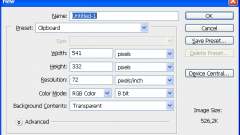
3
Now select in menu File – new. In the window that appears, make the following settings: set photo size – 4x6 portrait. The width and height it will automatically set in inches. For convenience can translate these figures into inches. Resolution should be 300 pixels/inch, color mode RGB color 8 bit, background contents white. Click OK. Create a new document, which will be constructed the main work.
4
Go to the document with the reduced photo. Take a photo using the Move tool and drag the newly created document. The will automatically be placed on a new layer. On the sheet format 10x15 cm can be placed 9 photos. So create eight copies of the layer with the photo and place them evenly, leaving a small field between shots. Save your work in the format.jpg" in the best quality and can proceed to printing.