You will need
- computer;
- photoshop;
- fantasy.
Instruction
1
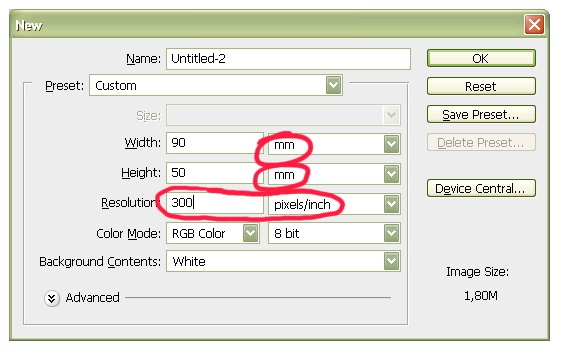
Before starting to design business cards, think carefully about what information you want to place on this small paper rectangle, what effect you want to achieve, what mood should carry a card.The imagination of designers in this field are endless, however, even the technologies themselves the production of business cards there is a great variety of wooden, plastic, metal, rag, etc.– because the business card is what makes it the host in some kind of unforgettable. However, the most popular, easy to manufacture and practical to use cards of heavy paper, coated single or multi-color image. The most common format for business cards is 90x50 mm. format to produce a card like this, open the program Adobe Photoshop. Create a new document File>New (File>New). In the opened window put required parameters in a generated document:
- size width 90 mm height 50 mm (if the next card has a horizontal layout)
- resolution is a very important parameter for the future printing of the incarnation should have a size of 300 dots per inch (300 dpi, pixel/inch)
- color model of the document Color Mode – RGB, if you are preparing a file for printing on a domestic printer or in the centre of operative Polygraphy. If you are preparing a file printing professional level, it is recommended to put the model (CMYK), although often this is unnecessary and only creates confusion.
- color of background (Background Contents) may default to put to White if mostly your card will maintain the color of the paper on which it is proposed for printing. Or you can leave the background transparent and get back to work on it after.Pay attention to the correct unit of measure field sizes – that's millimeters, not pixels, and dpi, not the pixels/inch.Check the parameters and press OK, a new blank document.

2
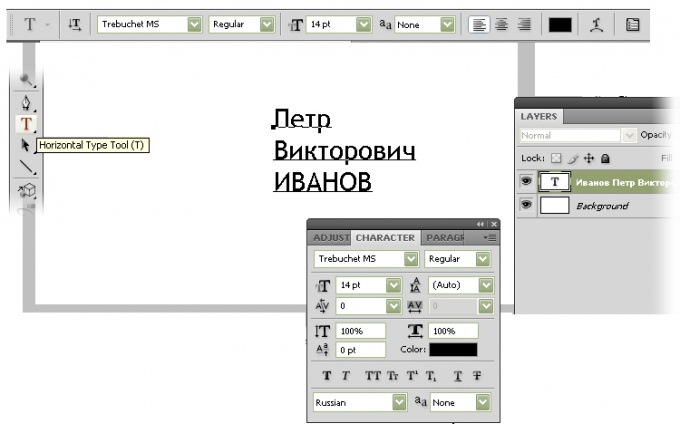
First of all, the card is the carrier of information about its owner, so we need to make the inscription with your name. For this we use the tool Horizontal Type tool. If selected, you will see how at the top of the working panel of the program, the band appeared with the main parameters of the future labels: font, font size, color, location, etc. Select the desired fonts font. Remember that too complex fonts – stylized handwriting, ornamental, games, and even create mood and ambiance, but really impairs readability of the card. You simply run the risk that your card in a pile of such just can't find, because your name will be unread at a glance. So, choose a clear font, clearly visible and understandable. The size of the font on the card, as traditionally developed, should not be less than 9 points and more than 14 – to remain easily visible at not so good illumination or imperfect printing, on the one hand, and on the other not to look ridiculous major like in books for preschoolers.Set the cursor to the desired place of our blank document and type text.Note that in the layers list of Layers there is a new text layer with a new inscription. You can always go back to editing: to change the text or move it by selecting that layer in the list and using the corresponding tools of the software.By the standards of Russian etiquette to the person listed in the first place, name and patronymic, and so they should be written first and the surname last. You can highlight a name by typing it in all capital letters.Enchanting to play with the sizes and font styles on a business card – a sign of bad taste. In General, to show that you are willing to cooperate, comply with the agreements and norms of business communication, force yourself to respect the rules and limit the need with the registration cards. It is allowed to use more than 2 fonts (not counting the style artistically font on the logo).

3
Below, under the name of the owner of the business card should write his position or profession, as well as the necessary contact information – phone, address, e-mail, etc. Use the same tool Horizontal Type Tool, only the font parameters are now a little change: you can reduce its size and, perhaps, to change the font style to italic.By the way, the menu Window can you find a paragraph Character (Font) and open the additional panel, which allows you to control various advanced options of the font – letter spacing, interline space, etc. it is Important to remember that, the average person dialing a phone with your right hand, hold your card with two fingers left, respectively, in the lower left corner. Of course, the worst possible location for contact information – closed fingers of the lower left corner. Release him if you don't want your business card looked silly and uncomfortable.
4
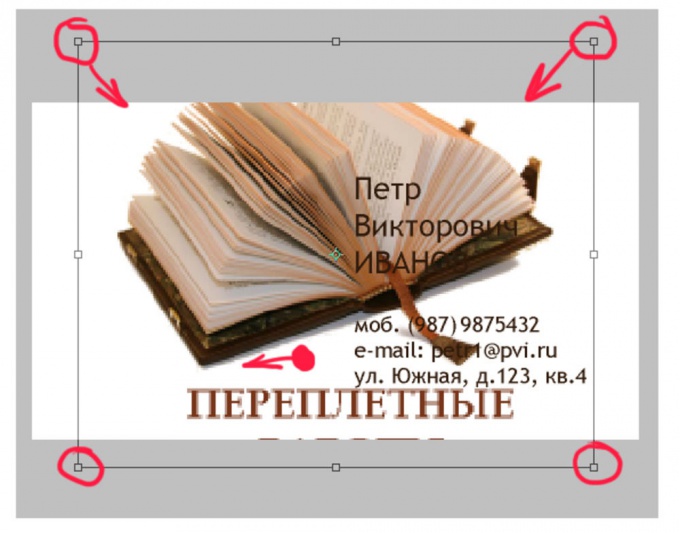
In free text of the cards you can place a logo or some design element. For example, there may be a picture somehow embodies the owner's business card, or describing his occupation. You can also place a small quantity – preferably in the concise form of information about services or aspects of activities, titles, regalia, unique offers, etc. it should be remembered that the card is not an advertising booklet, it is unlikely someone is going to be thoroughly and repeatedly to study it and explore.To place an image – it can be created separately in photoshop, find on the Internet or prepare using other software, you can copy it to the clipboard, then go to our document and paste there the contents of the clipboard using the command Edit>Paste (Edit>Paste) or by pressing Ctrl+V. In the layers panel the Layers we see a new layer added to picture. To change its location and scale is possible, using Edit>Free Transform (Edit>Free transform), or by pressing Ctrl+T. After these steps, around the picture will appear little square signs, moving that you can achieve the desired location and size of the picture.

5
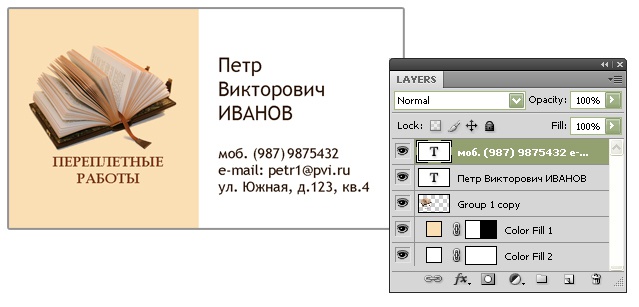
You can change the appearance of the business card, adding a background creating a new layer Solid Color or Gradient (Solid color or Gradient). This can be done using the menu Layer>New Fill Layer. Next, in the options, select one or more of the required colors. Please note that the default layer is the top layer – that is, lies on top of the previous symbols and labels are closing them. Nothing to worry, you can always move it from first to last place in the list, and he will be truly background. It many times you edit, you can double click on this layer in the Layers list, and choose the desired combination of colors.

6
To save the created card is recommended in two formats.- first, in the original format of the program photoshop, to return to correction and layer-by-layer editing of our document, the file takes a little more space, but each of the elements in this inscription, picture, background is saved independently and therefore can be independently modified.
- second, to save a file for transmission to the printer or print center. If you are critical of the size of the file, for example, it is necessary to send by e-mail, and the communication channel is too narrow, use the popular JPEG format. In the File menu>Save As (File>Save As) select from the list of formats corresponding item. Then in the opened settings window, set the slider to the highest quality image, because the size of the card is small, so small details are important to her, and when low quality pictures they can get lost.In General, it is recommended to save the image without quality loss using the TIFF format. He's not very popular, but does not introduce distortions in the original image. Save the file in this format by selecting the Save As window, para TIFF. Do not forget to disable the checkbox option Save Contact to Save layers), because the information that the layer where they were located, the print is not important.
- second, to save a file for transmission to the printer or print center. If you are critical of the size of the file, for example, it is necessary to send by e-mail, and the communication channel is too narrow, use the popular JPEG format. In the File menu>Save As (File>Save As) select from the list of formats corresponding item. Then in the opened settings window, set the slider to the highest quality image, because the size of the card is small, so small details are important to her, and when low quality pictures they can get lost.In General, it is recommended to save the image without quality loss using the TIFF format. He's not very popular, but does not introduce distortions in the original image. Save the file in this format by selecting the Save As window, para TIFF. Do not forget to disable the checkbox option Save Contact to Save layers), because the information that the layer where they were located, the print is not important.
Note
If I can make a card, but you do not need to stop there. You can try to make avatar.
