Instruction
1
Sign in to BIOS setup. For this you need to press a certain key or key combination after turning on the computer when checking the devices before loading the operating system. The most common option is pressing the Delete key or Del. To find out which key to press in a particular case, carefully observe the text on the screen when you turn on the computer. One of the lines will be prompt similar to the following: Press F2 to enter Setup.
2
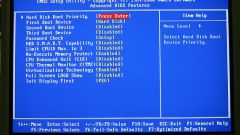
Locate the menu item that will be setting-enabling USB support in the BIOS. Depending on the BIOS manufacturer, this item can be called differently. Common options include Integrated Peripherals, Peripherals, Advanced. If such point was not, try to go to other sections - in one of them, you hit the required item from the next step.
3
Select directly responsible for the USB controller. It can also have different names in different BIOS versions. But his name will surely include the word USB for example, USB Controller, USB Device, USB Function OnChip USB the Onboard USB Device. It can be positioned directly in the previous paragraph, and in subparagraph Onboard Device USB Configuration OnChip Device.
4
Set the Enabled parameter to enable support for USB. In some versions of the BIOS may not only enable the USB controller, but also specify its operating mode using the points V1.1 and V1.1+V2.0. In this case, select the option V1.1+V2.0, which along with the mode of USB 1.1 will be used and the more modern USB 2.0.
5
Save the settings. To do this, select the menu item Save & Exit Setup in the main menu of the BIOS setup utility. The computer will automatically reboot, then USB support will be enabled.
Note
Do not change the BIOS settings, the value of which you are not clear, because it can lead to computer instability, failure and even breakage.
Useful advice
Navigate through the menu using the cursor keys to enter a specific section, use the Enter key to move to a higher level – press the Escape key. To change a parameter value, use the keys +, -, Page Up, Page Down.