You will need
- • screwdrivers Phillips and straight;
- • wrench (preferably flare) size 8/10 14/22 on and;
- • pliers;
- • a multimeter;
- • the cloth that absorbs moisture or wipes (lots);
- • new heater and (or) magnesium anode.
Instruction
1
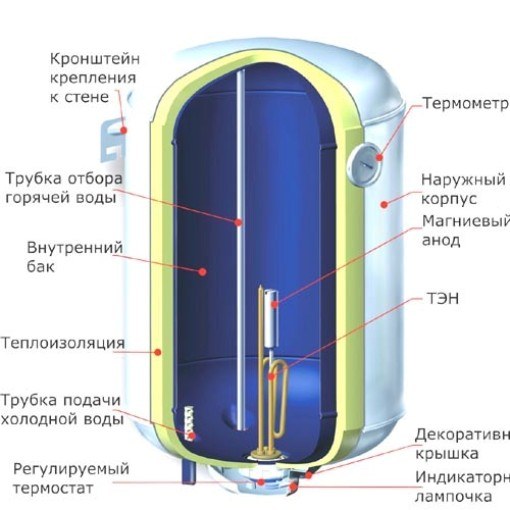
Conducting a technical audit of the water heater, it is necessary to disassemble the boiler, check the status of heating element, magnetic anode, remove scum and settled sludge. Such prevention will extend the life of your heater and in time to prevent the problem or replace the defective items.
2
If during maintenance and cleaning of the water heater and had traces of damage to the protective sheath of the heating element, it must be replaced by a new one. Also the heating element requires replacement if: the boiler is turned on and water heating is not carried out (if when checking with multimeter voltage present on the contacts of the Heater – this is a common breakage); when you turn on the heater, triggered protection RCD, which tells about the current leak or a short circuit, that is, malfunction of the heating element.
3
Magnesium anode is the main protection against electrochemical corrosion of metal parts of the heater. Magnesium, in comparison with iron, more actively interacts with water. He drains the oxygen atoms, as a consequence, a magnesium oxide, which precipitates and is displayed when cleaning the boiler. Causing the iron atoms remain intact, the tank is not damaged by corrosion. For this reason, it is necessary to monitor the condition of the anode and the time to change it for a new one. It requires replacement when the wear of over 40%. Is determined visually by comparing the magnetic anode from an operating boiler with a new one. If the first view has a worn – replace it.
4
Replace the heating element in the water heater does not differ from the technical audit and descaling and sludge.
5
First and foremost, you need to shut off the water supply. Disconnect the electric supply by removing the plug or by any other method. Using a screwdriver, remove the protective cover, measure no voltage at the terminals with a multimeter.
6
Next, you need to flush out the water heater. If the installation of the boiler was installed a separate faucet for the input of cold water, then just put the hose and drained the water. If you tap no, then take off the hose of cold water and decant the water into a bucket. Pre-open the hot water valve for admission of air into the tank. You can now remove the boiler from the wall, if there is such a need.
7
Start disconnecting the wires. In order not to confuse the wires when connecting them, write down what color wire from where I disconnected. Now you can remove the heater. It is attached, usually with 6 bolts. Depending on the model, the mount can vary. Remove the bolts need in turn and slowly as the tank has a little bit of water, silt and scale. All this is to gently decant into a bowl. Removing the heating elements, you need to clean the tank from gathered dirt using a rag and wipes, and leave for drying.
8
Next you need to replace the Heater and, if necessary, replacement of the magnetic anode for a new one, then assemble in reverse order, using your notes connection terminals. Also, you should check airtight gasket at the base of the Heater. If it is cracked or creased, replace it with a new one, otherwise the appliance will leak.
9
Connecting the electric part, we need to validate it again. Securing the protection you need to connect the hoses and try the cold water supply, after opening the faucet hot water outlet. The grid heater is not yet included! As you fill the boiler with water, you need to follow the leak up until the "hot" faucet stops releasing air. If leak was not detected, it is possible to connect the boiler to the mains.
Useful advice
Maintenance and cleaning of the water heater is recommended once a year. Magnesium anode must be replaced with a new one after 15 – 18 months of continuous operation. To replace the heating element in the water heater – to the extent of its failure.


