Instruction
1
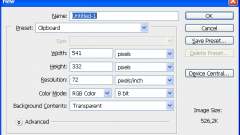
Launch Adobe Photoshop and create a new document of the desired size. To call the appropriate dialog, expand the menu "File" and select "New" or simply press ctrl + n. Dimensions specify in the fields "Width" and "Height". Make sure in the dropdown list "Content background" is selected the string "Transparent" then click "OK".
2
Insert the created document with a transparent background your image. If it is stored in the file, open menu in the graphical editor the same "File" and then click "Submit". This will open a window where you need to find the desired file, select it and press button "Place". The picture will be placed in the center of the document and it will be enabled transformation - you can move the image with the mouse or with the arrow keys. In addition, in this mode you can resize the pasted image, change the aspect ratio and rotate.
3
Choose quality settings and select format picture. To do this, under "File" select "Save for Web and devices" or use the shortcut shift + ctrl + alt + s. First, choose output format - this is two drop-down list in the upper right corner of the window. Transparency support for gif and png, choose one of the presets that are specific to these formats. Then, using the settings posted in this window, pick the most suitable for you combination of image quality and weight of the generated file. Quality will be displayed in the picture preview, and a weight of lower left corner of this image. Then press "Save".
4
Specify the name of the created file and place the save in the next window and press "Save".
Useful advice
If Adobe Photoshop is not installed on your computer, you can use its online version on the website http://pixlr.com/editor/?loc=ru.