You will need
- Adobe Photoshop not below 8-th version.
- photography.
Instruction
1
Open the photoyou want to edit. Ctrl+J copy the image to a new layer below with further work not to damage the original.
2
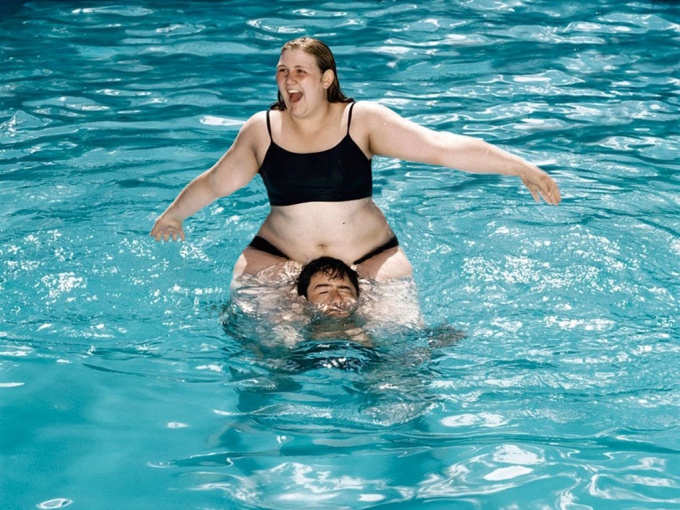
In the main menu, choose Filter ("Filter") and Liquify ("Plastic"). On the toolbar, activate the Freeze Mask ("Freeze"). Right in the properties panel set the brush size Brush Size=20, Brush Density Density ("Density")=100, Brush Pressure ("clicking on")=100. Such high density values and pressing need to mask is not smeared on the image, and hide those areas you want to protect from deformation. Changing the size of the brush, apply the mask on the image around that area that will handle. In our case it is the sea around the belly and the head guy. If picked up too much, activate the tool Thaw Mask Tool ("Unfreezing") and remove the mask.
3
Select a tool Push Left Tool ("Shift pixels") and configure its settings. The brush size should be increased to 60-100, depending on the size of the image, but the density and pressing lower to 20 to correction was neat and careful. If you move the cursor up, the pixels are shifted to the left if down right. Guide the tools to the right of the belly upward, to the left from top to bottom. Stomach a bit involved. Stick to this and start to handle the hands from the inner side. Go tools along the arms once and click OK to save the changes.
4
The filter window is closed, you're back on your main image. Please note that around the figure of the girl appeared blurred pixels are deformed region, not protected by the mask. On the toolbar, choose the Clone Stamp Tool (rubber Stamp). In the properties panel, set the hardness to 100% and the brush size 5-10 pixels. Image better enlarge for easier processing. Hover over the picture as close as possible to the figure of a girl, hold down Alt and click the mouse on the selected part of the background. The cursor will change and become similar to the telescopic sight. This means, the tool chose a sample picture and is ready to reproduce it. Gently glide the cursor over the blurry area – the image is replaced by something that moves the cross.
5
Once removed blurred pixels, again, choose filter Liquify, cover mask the background around the figure of the girl and continue to process the desired sites with tools Push Left Tool and Forward Warp Tool ("Warp"). Parameters is approximately the same. The second tool is not for nothing resembling a finger – they can smudge a picture or collect it in a pile. Every tool use no more than twice. After this, save the result, go back to the main image and again to remove the blurred pixels.
6
When she lost to a more manageable size, using the Clone Stamp tool Tool finish her bathing suit on the former site of the abdomen and treat the skin on your inner thigh, as the image blurred and stretched. Better to do it on a new layer.