You will need
- Adobe Photoshop
Instruction
1
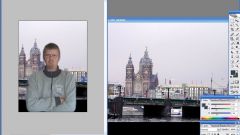
Open in Photoshop the two images — the photo, which you will change the background and the next background.
2
The next step towards change is the separation of the desired shape from the background of photos. Gently cut out your image using the Rectangular Lasso Tool, Pen Tool or quick mask. The Pen Tool is recommended as very convenient and easy way to highlight the image. If you accidentally put a new point on the wrong place, just press Backspace — this will correct the error. In addition, the pen tool involves the creation of vector arcs, which more clearly highlight your image. Creating the selection, click the right mouse button and copy it to a new layer with the smoothing parameter and without shading.
3
Then take the move tool and drag the object to the window, open the new background.
4
This photo montage can be completed, but often your pictures and the new background image can greatly vary the color settings and brightness, therefore, in addition to adjust these settings to make the image look realistic and beautiful.
Open Levels and adjust the levels of your pictures to a state close to the range the main background. Do the same in Hue\Saturation. In addition, you can edit the color range in the Color Balance and try different variations of layer blending to Soft Light, Hard Light, Multiply, and others. Advanced retouch the photograph, smoothen the bumps with the Clone Stamp and Gaussian Blur filter if necessary. Now your collage is ready.
Open Levels and adjust the levels of your pictures to a state close to the range the main background. Do the same in Hue\Saturation. In addition, you can edit the color range in the Color Balance and try different variations of layer blending to Soft Light, Hard Light, Multiply, and others. Advanced retouch the photograph, smoothen the bumps with the Clone Stamp and Gaussian Blur filter if necessary. Now your collage is ready.
Note
Open the picture in photoshop, duplicate the background layer (drag it into the layers panel to the new layer icon) and make the source code invisible. Mild cases, when the masks are generated very quickly (on the face of the sky background) and less. In cases where I have specified the chaotic sequence, it is possible to use any tools just to achieve the goal.
Useful advice
How to change background in photoshop? Photographed himself against the walls in the room, and I would like on a Sunny beach or on the moon? Step 3. If you accidentally put a point in the wrong direction, hit Backspace, then click on the last point of the set where necessary, and then continue to click as usual. You can also click on the unwanted point, right click and select “Delete anchor point”.