You will need
- A small Phillips screwdriver and a hexagon screwdriver, in addition stationery eraser and tape.
Instruction
1
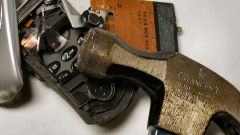
Free your workspace of unnecessary items. Prepare the box for storing bolts, so they are not lost. Separate the sidewall. Unscrew the hex bolt under the two sidewalls and the two bolt at the bottom rear of the cap. Even Unscrew the screws in the battery compartment. In the place where you removed the side panel, there are clips. Pry off with a screwdriver top cover. Disconnect the connector of the screen and Unscrew the Phillips-head screwdriver two small screw located at the top. In the upper right corner of the Board is the connector for the earpiece. Beneath it is the microphone. Detach the connector from the case and separate the Board from the screen.
2
Clean eraser the contacts of the loop – they will start to Shine. Flip the screen. Connect the shield to the Board. Next you need to enable this design. On the Board with tape fasten the battery. For this design to work, you need to remove the lock, which is located between the CF connector and the battery. Press the Power button on the Board.
3
Usually the failure is that it lost the contact of the plume with the touch screen. To check this, put the eraser on the region of the connection of the Flex cable and screen. Push down lightly on it and drag the stylus across the screen. If everything worked, you can easily fix it. Cut very thin and flat strip of the eraser, about 1 mm. Glue this strip in place of the contact of the plume with the screen glue that solidifies immediately. When you build it later turns out that the screen is not recovered, move the eraser in a more appropriate place.
4
Assemble everything in reverse order. Don't forget the microphone and tape if you left them to mount the battery. Sometimes disassembly can lead to "hard-reset", for example, due to the fact that the villages of the auxiliary battery. In this case, install this version and start recovery process.