Instruction
1
Even such simple actions as combining two images into one, there are several ways. You can use them in a graphics editor such as Adobe Photoshop.
If you do not need accurate adjustment of the dimensions of the image, you can use a fairly simple option. Open one of the photos in the editor via menu File - Open or drag. In the left pane, choose Crop tool (Crop). With it, allocate the entire image. The next step depends on which side of the first you want to put a second photo. For example, if the right - in the same direction, drag the mouse cursor from the center of the right edge of the selection. Thus, you will "add" the space of the original image.
If you do not need accurate adjustment of the dimensions of the image, you can use a fairly simple option. Open one of the photos in the editor via menu File - Open or drag. In the left pane, choose Crop tool (Crop). With it, allocate the entire image. The next step depends on which side of the first you want to put a second photo. For example, if the right - in the same direction, drag the mouse cursor from the center of the right edge of the selection. Thus, you will "add" the space of the original image.
2
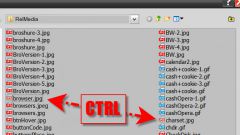
Open the second photo in the editor. By using the tool "Rectangular selection" (key M) select the entire image (Ctrl + A). Copy the selection (Ctrl + C or menu: Edit - Copy). Then navigate to the window where you were working with the previous picture. Paste the image here (Ctrl + V or Edit - Paste). Then select the Move tool (move tool) and align the second image relative to the first. If space is not enough, again use the framing. If, on the contrary, proved to be too much, the same cropping reduce the size of the field. Save the entire image in JPG format (File - Save As - select JPG format).
3
If necessary fine adjust the image size before saving, go to Image - Canvas Size. Here select required frame sizes. If the photos are too small or too large, they will have to stretch or shrink using the same "rectangular selection". For this, select photos with the help of this tool, click the right mouse button and select "Free Transform" (Free transform). Stretch the corners of the photo as you see fit. To navigate to another picture, go to the toolbar Layers ("Layers") and select the layer with the image. Then repeat the compression/stretching.
Useful advice
So when stretching/compression preserved the proportions of the photo, hold the Shift key.