Instruction
1
So, in Microsoft Office Word, you can adjust the width of fields in several ways. Run the program and click the "page Layout". Find the block tools "page Options". Hit it on the button-thumbnail "Field". From the context menu select the last item called "Custom fields".
2
This will open a new dialog box. Make sure you are on the Fields tab. In the same group, set the value to zero for top, bottom, left and right margins. If you set the parameters for binding, change them.
3
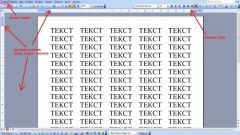
Receiving a notification that the part of the text with these settings may be outside the printable area, select one of your suiting options: either still apply the settings with null-value fields, either click on the "Fix". When you click on the button "Fix" the document will set the minimum size field. The average is 0.35-0.4 cm. The emergence of this alert is due to the fact that your printer may not support printing with zero settings fields.
4
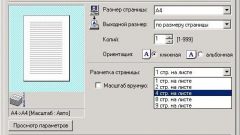
Approximately by the same principle, you can adjust the size of the fields in the preview mode of the document. Click on the Office button and select "Print" item "print preview". When the program window changes, click on the thumbnail Fields.
5
Also access window where you can adjust the size of the fields, you can open the other way: being on the tab "page Layout", click the arrow in the "page setup". This will open a new dialog box, navigate to the Fields tab and the respective group to set the desired values.
6
In the graphical editors to specify the size of the fields (or lack thereof) you have when you go to print window. In the menu "File" select Print (File - Print) and using the mouse position the image on the sheet in a manner that suits you. After that, click "Print" (Print).