Instruction
1
For transferring large files, including images, via the Internet, especially low speed, and for recording photos on flash drives and CDs, it is appropriate to change one image format to another, smaller, but not inferior in quality to the image.
In this format are JPEG and PNG. And eating PNG does not change the parameter “Quality” of the original image, leaving the quality of the photo at 100%, JPEG allows you to compress the schedule and achieve the image quality 95%, 90%, 85% or even 80%. If you reduce the quality of your pictures from 100% to 97%, for example, visual differences in the photo there, but the file size is reduced. This means that JPEG saves disk space and web traffic, if you decide to send a photo by e-mail or upload to the website.
In this format are JPEG and PNG. And eating PNG does not change the parameter “Quality” of the original image, leaving the quality of the photo at 100%, JPEG allows you to compress the schedule and achieve the image quality 95%, 90%, 85% or even 80%. If you reduce the quality of your pictures from 100% to 97%, for example, visual differences in the photo there, but the file size is reduced. This means that JPEG saves disk space and web traffic, if you decide to send a photo by e-mail or upload to the website.
2
To change the format of the image in known graphic Adobe Photoshop, open the file with a picture or photo (top menu, “File”, “Open...”) and save the file as a new image to change the format. To do this, again select “File” and then “Save As...”.
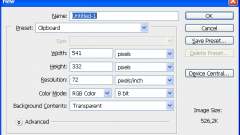
3
In the window that appears you will see a drop down menu of “Format”. Select a format *.JPEG, he's *.JPG, and *.JPE, rename the file not to overwrite the original and click "save" ("save"). In the new window that appears, select either a preinstalled image quality:
- Maximum (Max.)
- High (High)
- Medium
- Low (Low)
either install the desired quality of the photo slider from 1 to 12, where 12 is the maximum quality without losing the original. After that, click “OK”. The photo format has been changed successfully.
- Maximum (Max.)
- High (High)
- Medium
- Low (Low)
either install the desired quality of the photo slider from 1 to 12, where 12 is the maximum quality without losing the original. After that, click “OK”. The photo format has been changed successfully.