Instruction
1
To get started, create in Photoshop a new document and using the tablet to make the sketch – apply on the white background of the main lines and contours of the future portrait, mark the location of facial features, create a silhouette hairstyles thin lines. When the sketch is ready, create a palette of colors for drawing skin.
2
Create a separate layer and choose a few main colors that you will paint the skin – the basic tone, and then a pair of lighter and darker transitional colors. Subsequently you will not have to choose colors while painting – just go to the layer palette and using the eyedropper to choose the right shade.
3
Paint all the skin in the portrait neutral main color to create the basis, and then work the shadows a darker shade. Select a soft pink lip color and mark their outlines. Lighter shades of beige mark region on the face on which the light falls, and then more details mark shaded areas and cheekbones.
4
Using the basic brush settings, Shape Dynamics and opacity 70% with a thickness of 2-4 pixel draw eyebrows, directing the hairs to one side. Tips of the eyebrows do thin and elongated with different levels of pressing the pen on the tablet.
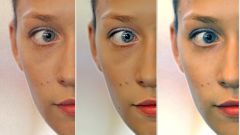
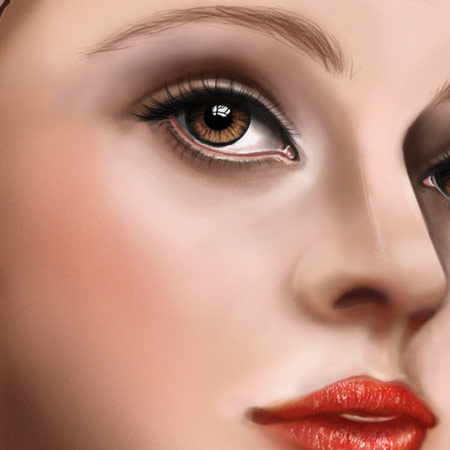
5
Paint the eyes of the main colors, lightly darken the edges and the Central portion of the eyeball making it a little lighter. Shade the upper eyelid and apply a little shadow on the lower eyelid. Lighten the iris, drawn on the primary tone eyes black pupil and take him a large number of thin rays.
6
Make the iris volume, drawing these rays brush of different thickness. Around the inner corner of the eye add a bright spot, and then draw in the corners of the eyes pink dots. On a new layer draw the eyelashes are dark, thin brush with 60% opacity. Using the Dodge Tool and the Burn Tool lighten and darken parts of the eyes, making them deeper and more alive.
7
After the eyes, draw lips – draw over the base color of the shadows in the corners, and spots of light. Draw a curved line forming the contour of the lips, diffuse and thin brush draw the texture of the lips. On the upper lip, apply a small luminous area, and then create an adjustment layer with a levels (New Adjustment layer>Levels) and tweak the basic tone of the picture.
8
Merge the layers and duplicate the created layer. Add a little noise by selecting filter Add Noise, and set to 7-9%, and then erase the noise from all the areas of drawing, besides the skin. Texture the skin, using basic transition color from the palette, and then draw the hair.
9
First create the General amount of hair outlining inside the contour region darker and lighter colors, and then draw strands in the field of moving color. Where the light does not lighten the hair, darken them. Create a portrait background.