You will need
- - computer with installed Adobe Photoshop;
- - photography in digital form.
Instruction
1
Open the program Adobe Photoshop and in the menu "File" - "Open", locate your photo.
2
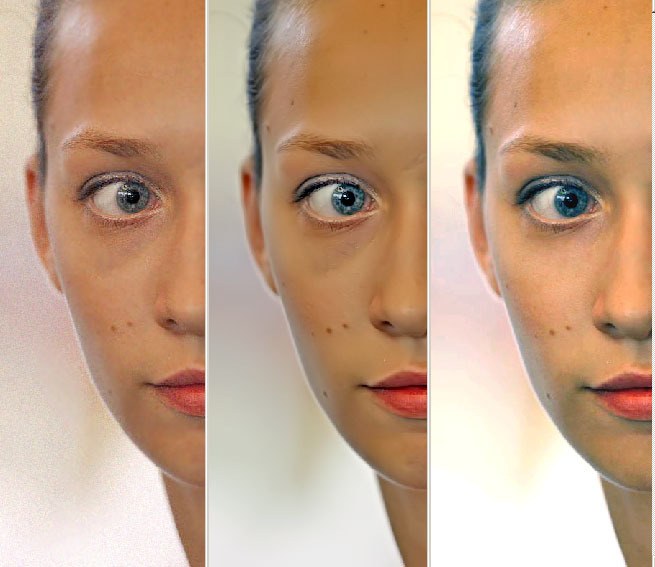
Make a double layer with the original photo and continue on the copy. Go to menu, go to Image, then sub-section Adjustment, and in the opened list select the function of Shadow/highlight. You will see it is the correction of light and shadow.
3
Move the controller while observing the changing picture while you are not satisfied with the result highlighted or shaded areas. If at some point the picture became darker or lighter, and you're not wanted, use the background eraser to erase the required region.
4
Use the Dodge tool lighten. This is another method to remove shadows from the face on the photo. Find it on the toolbar located on the left side of the program. Make double, as in the example above, and select the desired tool.
5
Adjust the clarifier, setting exposure 25%. Range set to mid tones. Lighten the photo by moving the mouse cursor.
6
Use the blending modes of the layers. It is also one of the ways quality lightening photos. Take two of the same layer as the original and double image. Select the Blending mode function Screen. View, the picture became noticeably brighter.
7
In order to slightly decrease the lightness, adjust the layer transparency. Erase everything except the face, a large eraser with a soft edge. The image will be saved in their original colours, the face of the person to be noticeably brighter.
8
Open the filter menu function Render>Lighting effects and do the correction light sources.
Useful advice
To correction the photos were better quality, use all the above offer ways to lighten faces in Photoshop by combining them in retouching and photo editing.