Instruction
1
Click right mouse button on a free space on the working tableand will open the context menu. Hover over the string "Properties" and click it with the left mouse button. A window appears with the settings of "display Properties".
2
Start with the tab "Themes". The theme of the working tableand is the background image (picture), a set of sounds, icons, and other elements used to customize the appearance of the working tableand with a single click. Hover over a theme you like, click on it with the left mouse button and after clicking on the "Apply" button the option selected will be immediately displayed on your office tableE.
3
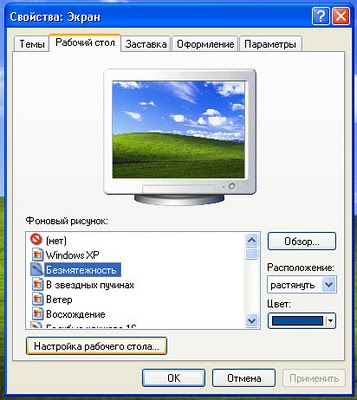
Tab "work table" gives the possibility to change the background image (a picture, a Wallpaper) to a given topic. You can select from a proposed set, and by clicking on the "Browse" button, to access their own files. Select the desired picture. Once in the field "file Name" will be the name of your object, hit "Open". In the option "Location" set location pictures by selecting one of the offered options: center, tile, stretch. If you like "clean" work table, the list of themes select "No" and option "Color" choose a color for the background of the working table.
4
Without leaving the tab "work table", click "Setting the table". You will see the window elements of the working table". Select the General tab. Here you can enable and disable system icons by putting the appropriate checkboxes. If you want you can change the graphic image of the icons using the button "Change icon". In the bottom of the window, you can configure automatic management clean the working tablefrom unused items. If you have no need for this, then simply do not put a checkmark in the control field option.
5
If, instead of the background image you want to see on your work tablee page from the Internet, go to the tab "Web". To prevent changes and moving items working tableand tick the management option "to Consolidate elements of the working table". Save changes with the button OK. Window elements of the working tableand closes. Shut down in this tab by pressing "Apply".
6
Using the tab "screen Saver" you can set the so-called "screen saver". This feature was needed when the monitors consisted of a cathode-ray tube to protect from fading. Modern monitors such protection did not need, and to protect confidential information from curious or malicious users, this feature will come in handy. To do this, choose the appropriate screensaver from the proposed set, program the interval at which it will be automatically enabled if you do not make manipulations with mouse and keyboard and set password protection.
7
To change the power settings of the monitor, click on the button "Food". A window will open "power options Properties", with which you can manage the sleep mode and the uninterruptible power supply. Save your configuration changes and close the window using the button OK. Before leaving the tab, click "Apply".
8
The next tab "Design" offers the choice of opening styles of Windows and buttons, color scheme and font size. With the buttons "Effects" and "Advanced" you can assign additional settings to the selected style in the form of shadows for menus, smooth edges of screen fonts, large icons, etc.
9
In the last tab "Settings" use the slider to select the screen resolution settings. For 17 inch monitor optimal resolution - 1024x768 for monitor 19 inch 1280x1024 or 1400х1050. In the lower right corner of the window click "Advanced" and select the "Monitor" tab. Set the maximum refresh rate of the screen. Save with the button OK. Click on the "Apply"button.
So, you've finished setting properties screen. Now close the window "display Properties", clicking on the x in the upper right corner of the window.
So, you've finished setting properties screen. Now close the window "display Properties", clicking on the x in the upper right corner of the window.
10
Again, return to the context menu by clicking right mouse button on a free space on the working table.
The option "Arrange icons" will help you to distribute the icons on a working table, e is convenient for operation.
Option "Insert" will give you the opportunity to host you previously copied the file to the desktop, tableE.
With the option "Create" you can create a new document file or a new working directory.
Note
All operations on the selection of specific options are made with the left mouse button.
When working with context menu:
- options can be enabled or disabled; to enable the option, you must install with the wallet;
- if any option is grayed, in this configuration, it is grayed out, and cannot be influenced.
When working with context menu:
- options can be enabled or disabled; to enable the option, you must install with the wallet;
- if any option is grayed, in this configuration, it is grayed out, and cannot be influenced.
Useful advice
On the desktop it is better to place the program shortcuts. The shortcut – not the program itself, but only the link to it. If you accidentally delete the shortcut icon, the program will remain untouched, and you can then create new shortcut. It is still necessary in order to avoid overloading the local disk where the operating system of your computer. Ie all programs and work files can be stored on other local disks and control them via shortcuts located on your desktop.
To create a shortcut, right-click the mouse on the desired folder or program and select "Create shortcut" and click the left mouse button. Now the shortcut icon, drag to the desktop.
The desktop background you can make any of your photo or picture. To do this, use an alternative method – open the desired photo, double-clicking on it with the left mouse button, then right-click on the field of photography and in the opened menu, select "Make desktop background".