You will need
- - cardboard
- - scissors
- glue
- compass
- - flexible measuring tape cm
- - line
Instruction
1
To determine the size of the future cardboard hats measuring tape measure the circumference of your head. Then, calculate the radius of the inner (smaller) circular part of the brim of a cap according to the following formula: radius = head circumference / 6.28. It will be a smaller radius. Now calculate the radius of the outer (larger) circumference of the brim of a cap, adding to the obtained radius of the inner part of the brim of a cap 25 cm (the width of the brim of a cap). It will be a larger radius.
2
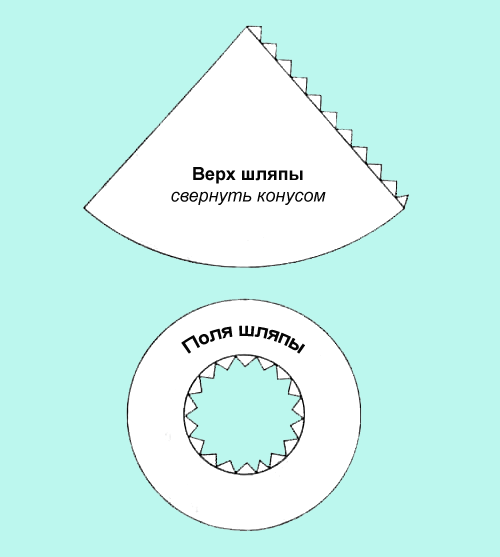
Take a sheet of cardboard and draw with your compass a circle of larger radius. Then from this point draw a circle of a smaller radius. Inside the circumference of the smaller radius, draw valves with a length of approximately 3 cm, which will further help to glue the field to the top of the hat. Cut out the inner part of the brim of a cap, leaving the valves.
3
Draw a circle with a radius of 25-30 cm and cut from it the top part of the hat (about 1/4 circumference), leaving a flap for bonding the edges of the cone. Fold the top part of the hat cone and glue the valve to the other edge of the cone.
4
Lift the flaps on the inner circle of the brim of a cap and spread adhesive. Press the upper part of the hat to the brim of a cap valve. Cardboard hat ready.
Useful advice
- for the manufacture of hats, don't use corrugated cardboard (boxes from large appliances) because this Board is not flexible enough.
- the finished hat can be decorated with ribbon, Christmas tinsel or the application of colored paper
- the finished hat can be decorated with ribbon, Christmas tinsel or the application of colored paper
