You will need
- Dense fabric for the front side – 2 length cloak+20 cm on the hood
- Thin fabric for the lining – 2 length
- Brooch or decorative pin
- 2 sheets of drawing paper
- Line
- Pencil
- The compass
- Protractor
Instruction
1
Glue the long sides 2 wetmanski sheet. On the long side at the point of gluing a dot. This will be the center of the washer. Draw with the center at this point is a small semi-circle with a radius of 15-18 cm From one of the points of intersection with the side of the sheet aside the length of the coat. Draw a second semicircle.
2
Cut out the pattern and just put it on thick fabric and the lining, if the width of the cuts 140-150 see If the fabric is narrower, you'll have to cut wedges. Divide the semicircle into 5 equal parts. This straight angle in the center of the semi-circles divide by 5 using the protractor, at 36 degrees. Cut one of the wedges, take 5 from the same cloth and from the other, sew, Tutuila and treat the seams. The upper section of the lining is also sewn.
3
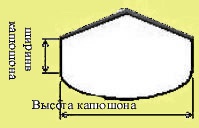
Will have plenty of dense tissue 2 parts of the hood. On the sheet of paper, draw a first rectangle, the short side being half the length of the circumference of the small ring. The longest side is equal to the intended height of the hood. Aside from the two short sides at 7-10 cm and connect the resulting points in parallel lines. Find the center of each of the Parallels. On the one hand connect the middle with the sides of the original rectangle. On the other hand, swipe the arc, connect the end points of the short side of the source rectangle with the mid-perpendicular.
Cut out the pattern. Circle it on thick fabric and the lining. Sew parts of hood on the direct parties.
Cut out the pattern. Circle it on thick fabric and the lining. Sew parts of hood on the direct parties.

4
The main part of the cloak preberite at neckline. Baste and sew the outer part of the hood. Preberite the lining of the cloak and sew the hood lining. Fold and stitch the hem of the cloak and the lining.Fold the details right sides together and aligning of the side seams. Baste and sew. Tutuila cloak. Will attrocity with the outer side of the neckline.
Note
The fabric depends on the purpose of the cloak. For field conditions it is better to take the "historical" fabric. This can be, for example, promoline linen cloth, from which in the old days and sewed the cloaks, and Cape. But the same pattern you can sew a fancy Cape. It is better to take a thin cloth or even velvet.
For the "field" of the coat as the lining uses normal cotton cloth. Lining dressy coat it is better to make silk.
For the "field" of the coat as the lining uses normal cotton cloth. Lining dressy coat it is better to make silk.
Useful advice
If the width of the fabric is small, then first you have to pristroit the missing piece, and then cut wedges.
Begin to sew the coat lining and is better at the bottom.
The cloak can be done with a different clasp. It will have the junction of the hood and cloak to stitch the neckline and 3-4 cm below.
Begin to sew the coat lining and is better at the bottom.
The cloak can be done with a different clasp. It will have the junction of the hood and cloak to stitch the neckline and 3-4 cm below.
