You will need
- - screwdrivers;
- - conductive adhesive;
- - cotton pads;
- liquid for cleaning;
- - wet wipes;
- - the red marker.
Instruction
1
Remove the plug from the keyboard connector of your computer. In any case, do not attempt to disassemble the keyboard is enabled, otherwise you risk to mess up your computer. If the keyboard is wireless then remove the battery or batteries.
2
Remove from the slots all the rubber plugs that cover the head bolts. Please read the manual. It should be a location of all fixtures of the body. Also visit on the Internet forum devoted to computer technology. There you can find information on how to disassemble your model of keyboard. Will also be very useful to read tips and testimonials from those who have already done this procedure.
3
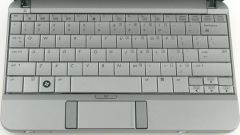
Carefully Unscrew all the screws connecting both parts of the housing together. Find the location of all the plastic latches. Gently open them. Be very careful! If some kind of latch you miss, then when opening it breaks.
4
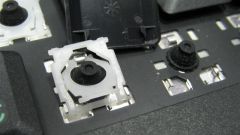
Remove the keypad buttons. Usually they are of two types – separate (each button in a separate cell) and as a whole leaf ( all buttons are a single surface). In the first case, you will have to pull each button, and the second just to pull the canvas. If the buttons are separate, then don't forget before you start disassembly take a picture of the keyboard not to mix their places at build time.
5
Under the buttons is a layer of translucent polyethylene, which are deposited on the wirings. Carefully remove this layer. In any case, do not pull it sharply! Otherwise you risk to break the structure of the material, and also break up a thin track.
6
Clean the surface. If the keyboard was filled with liquid, the first step is to thoroughly clean the surface of the plate. To do this, use cotton pads soaked in a special solution, or a wet cloth.
7
Locate damaged areas of the tracks. If the broken places can't visually find, use to test the tester. Need with maximum precision to find broken areas.
8
All identified gaps carefully mark with red marker.
9
Take special conductive glue and apply it on the place of tears, along with a bit of whole sections of track on each side. For application, use a very fine brush or a special tube.
10
Let dry the glue. Then produce a reverse Assembly of the keyboard and check its functionality.
Note
Almost any drenched keyboard can be repaired, by restoring the damaged tracks conductive adhesive. How is the prevention? Only after the final drying, it is possible to assess the extent of damage current-carrying paths. If the track went dark and tears, you can try to restore the special conductive varnish.
Useful advice
If the integrity of the track, then, of course, the motion of electrons is interrupted, and the keyboard will be broken. The integrity of the tracks can be broken for various reasons: - the crack was formed from inept Then prepare the disassembly of the material, which corresponds to the lowest resistance, the working mixture for the recovery Board tracks the keyboard or use the remaining mixture, if there is a sufficient number.