You will need
- - Arduino;
- digital potentiometer AD5171;
- led;
- - resistor 220 Ohm,
- - 2 resistor 4.7 kOhm;
- - connecting wires.
Instruction
1
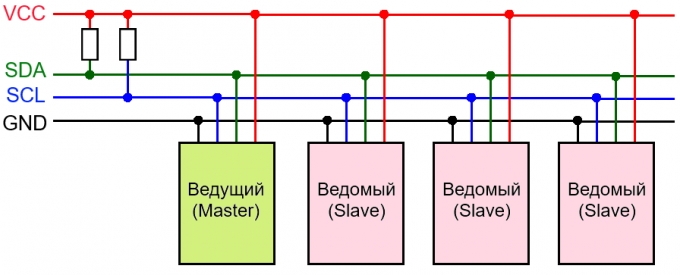
Serial communication Protocol IIC (also called I2C - Inter-Integrated Circuits, minicasino connection) used to transfer data for two bidirectional communication lines, which are called the serial data SDA (Serial Data) and the bus clock SCL (Serial Clock). There are also two lines for food. Bus SDA and SCL are pulled to the power bus through the resistors.
The network has at least one master device (Master) which initialisere data transfer and generates the synchronization signals. The network also has a slave device (Slave) that transmit data upon request of the presenter. Each slave has a unique address, which is a leading and turns to him. The device address specified in the passport (datasheet). To the same I2C bus can connect up to 127 devices, including several leading. The bus devices can be connected in the process, i.e. it supports "hot plugging".
The network has at least one master device (Master) which initialisere data transfer and generates the synchronization signals. The network also has a slave device (Slave) that transmit data upon request of the presenter. Each slave has a unique address, which is a leading and turns to him. The device address specified in the passport (datasheet). To the same I2C bus can connect up to 127 devices, including several leading. The bus devices can be connected in the process, i.e. it supports "hot plugging".
2
The Arduino uses the I2C interface two ports. For example, the Arduino UNO and Arduino Nano analog port A4 corresponds to SDA, analog port A5 corresponds to SCL.
For other models:
Arduino Pro and Pro Mini to A4 (SDA), A5 (SCL)
The Arduino Mega is 20 (SDA), 21 (SCL)
Arduino Leonardo - 2 (SDA), 3 (SCL)
Arduino Due - 20 (SDA), 21 (SCL), SDA1, SCL1
For other models:
Arduino Pro and Pro Mini to A4 (SDA), A5 (SCL)
The Arduino Mega is 20 (SDA), 21 (SCL)
Arduino Leonardo - 2 (SDA), 3 (SCL)
Arduino Due - 20 (SDA), 21 (SCL), SDA1, SCL1

3
To facilitate data exchange with devices on the I2C bus for Arduino is written standard library "Wire". It has the following functions:
begin(address) - initialize the library and connect to the I2C bus; if the address is not specified, the attached device is considered a leading; use 7-bit addressing;
requestFrom() - used by the master to request a certain number of bytes from the slave;
beginTransmission(address) - start data transfer to the slave at a particular address;
endTransmission() - end of the slave transmission;
write() - write data from the slave in response to the request;
available() - returns the number of bytes of information available for the reception from a slave;
read() - read bytes transferred from the host or the slave from the master to the slave;
onReceive() - specifies a function that should be called when the slave receives a transmission from the master;
onRequest() - specifies a function that should be called when the host device receives the transmission from the slave.
4
Let's see how to work with the I2C bus with Arduino.
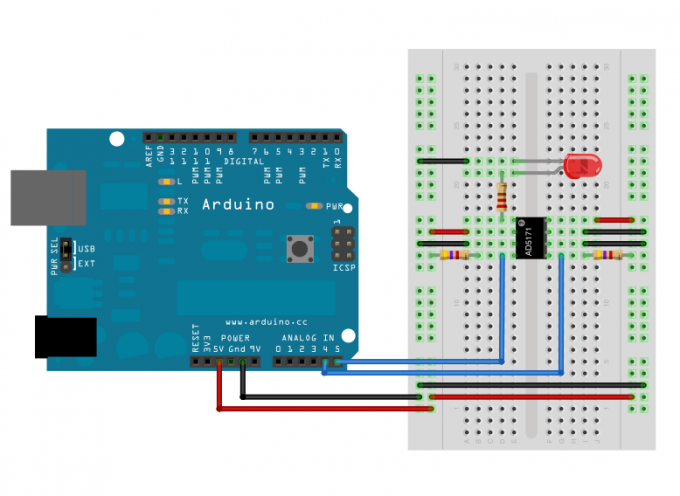
First assemble the circuit as shown. Will control the brightness of the led using digital 64-position potentiometer AD5171, which is connected to the I2C bus. The address to which we will refer to the potentiometer - 0x2c (44 decimal).
First assemble the circuit as shown. Will control the brightness of the led using digital 64-position potentiometer AD5171, which is connected to the I2C bus. The address to which we will refer to the potentiometer - 0x2c (44 decimal).
5
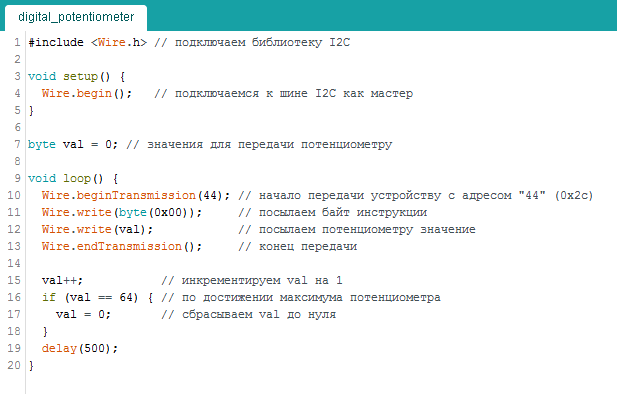
Now open the examples library "Wire" sketch:
File -> examples -> Wire -> digital_potentiometer. Upload it into the Arduino memory. Turn on.
You see, the brightness of the led cycles increases, and then abruptly turns off. In this case we control the potentiometer with the Arduino using the I2C bus.
File -> examples -> Wire -> digital_potentiometer. Upload it into the Arduino memory. Turn on.
You see, the brightness of the led cycles increases, and then abruptly turns off. In this case we control the potentiometer with the Arduino using the I2C bus.