You will need
- liquid rosin and solder;
- - soldering station or soldering iron with a fine tip and adjustable heat;
- - a scalpel;
- - tweezers.
Instruction
1
First you need to make sure that failure came the motherboard. Rent from a friend a known-working power supply. Disconnect the computer from the mains, remove the side panel and disconnect your power supply from the motherboard, connecting is OK. Connect the electricity and hit the Power button. If the computer is started (on the Board lit up indicator, spun the CPU, the dynamics of a single short audible signal), then the problem is in the power supply.
2
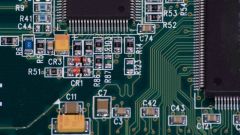
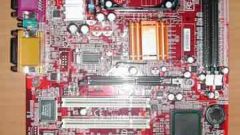
If nothing has changed, you may have a defective motherboard. If the warranty on it has expired, return the unit to seller for repair or replacement. Otherwise, try to understand the cause of failure to lose anyway, nothing.Get the parent fee from the housing by unscrewing the screws that it is secured. Place the device on a table and inspect. The most frequent cause of failure of electrolytic capacitors become small cylinder coated on the top side cruciform incisions. This end should be flat. If the top of the capacitor swelled or charge around him dripped the liquid you found the problem.
3
Better to change all capacitors of the same type, even if failure came only one. The capacity of the new capacitor should be the same, the voltage can be higher. For soldering it is better to use soldering station – less likely to damage the charge and elements. If this is not possible, find a desoldering pump and a soldering iron with a fine tip and adjustable temperature. Secure charge vertically. Alternately, remove all the old capacitors - to do this, gently warm up the soldering on the back side of the Board, the capacitor with tweezers.
4
To put new items, you need to release from the tin holes in the Board. Warm the area with a soldering iron and try to remove the tin suction. If that fails, point the hole thin metal rod, holding it with tweezers and warm up the soldering iron, pressing down. In a pinch, you can use the drill with a thin drill.
5
Mounting legs of the capacitor into the holes of the correct polarity – the "plus" marked on the body of the instrument, and on the Board. Dilute the findings of the electrodes on the reverse side of the Board for stability, cut off excess with wire cutters. The heated soldering iron leg oil liquid rosin, then apply a bit of tin.
6
If the inspection fees you find damaged wirings carefully narrow with a scalpel blade or clear varnish on both sides of the defective area. From copper cable remove the thin Postings, cut a piece the desired length. The ends of the wiring and cleaned the place on the track will saladita and carefully solder. This method will help in that case, if the damage is not too deep: motherboard – layered device. The inner layers of the repair will fail.