You will need
- - Photoshop;
- photography.
Instruction
1
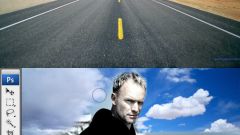
Open the picture, the background which is going to alter in Photoshop option Open from the File menu, Ctrl+O or dragging the file icon in the editor window. Put on a photo a new layer by clicking in the layers palette to the Create a new layer button.
2
Pick up main color future background. Photoshop allows you to edit the image so that it looked natural on any backgroundE. However, if the picture was taken in a well lit area, the selection of the light backgroundbut will allow you to avoid additional processing. For photobooks with a large number of shadow will suit the dark background.
3
Fill the created layer is chosen for the backgroundand color, applying Paint Bucket tool. Use the option group Reveal All Layer Mask on Layer paste on the solid layer mask.
4
Ctrl+J copy the photograph on a new layer and separate from the old backgroundand the foreground object by using the Extract filter window which offers the option to Extract the Filter menu. The result can be far from perfect, but you will have the opportunity to correct him.
5
Edit the mask of the future backgroundand which is the topmost layer in your document. For this option Load Selection menu Select load selection from layer, processed by the filter Extract. Pressing the keys Shift+Ctrl+I invert selection. Navigate to the new backgroundand fill with black selections of his mask. Deselect with Ctrl+D. If necessary, adjust the edge mask with the Brush tool.
6
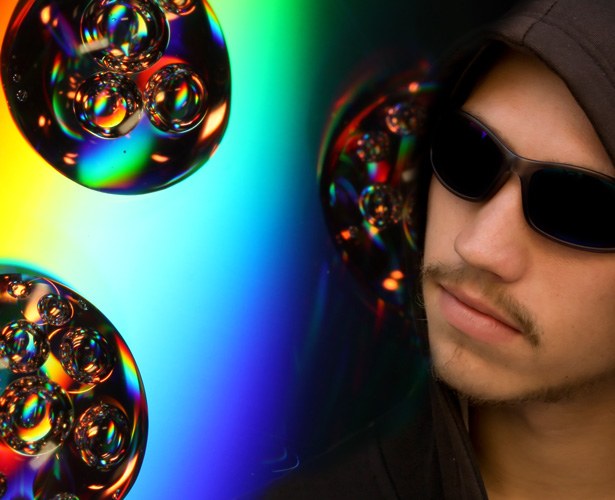
Created a plain background looks flat. To give it more volume by creating a simulation of light rays and adding prints of brushes of different sizes scattered in a random order.
7
To draw coverage over the top to create the backgroundas a new layer. The Polygonal Lasso tool, select an elongated trapezoidal shape. Its inclination should coincide with the direction of the light source in the picture. Select the color for the generated beam which would be combined harmoniously with the colors on photography. For dark backgroundand you can use the white color for a brighter image blue suit, yellowish or reddish shades.
8
Fill selection with chosen color and apply to the created figure the option Motion Blur band Blur Filter menu. Adjust the direction of the blur so that it coincided with the tilt of the beam. Create multiple copies of the processed layer and apply the Free Transform option from Edit menu. Changing the image size, you get a more narrow beam.
9
The Move tool move copy layers to obtain a lot of rays of different thickness. Part of the light lines can be shifted for the piece in the picture. To do this, go to the backgroundand load a selection, using as the source mask of this layer. Go back to simulate the light and remove the fragment covering the subject, a Clear option of the Edit menu.
10
Put on less lighted area of the backgroundand fingerprint brush. To do this, create another layer and open the Brushes palette. Including the Brush tool, select a sample of the brush, the traces of which you fill in a fragment of background. This can be done in the tab Brush Tip Shape. Configure the settings for the scatter prints in the tabs of the Shape Dynamics and Scattering, focusing on changing the picture in the lower pane of the palette. If you want to the brush marks of different colors, adjust the Color Dynamics tab.
11
Complete prints of the brush top layer. Unable to duplicate the resulting image and place some brush marks in front of the figure in the picture. Reduce the Opacity value for the layer with these prints.
12
Save the resulting image in the psd file with all layers. You might want to change the details of the created background. Apply to save the option Save As File menu. For quick viewing of your edited photos , select the jpg format.