Instruction
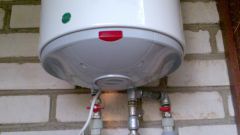
1
Usually the water heater is on the rear surface of the attachment plate with the notched holes in the shape of a keyhole. These holes need to log-heads are fixed to the wall screws or dowels. Work on the heater installation is best done together: one person holds the heater, the second notes with his pencil attachment.
2
Pay attention to the accuracy of marking – even a small deviation can lead to the fact that enshrined in the wall screws or dowels will not fit the holes of the mounting plate of the water heater or appliance will be installed obliquely.
3
Fastening the heater on a concrete or brick wall is easiest to implement using dowels and a nail gun. In that case, if this is not possible, drill the wall drill the holes for the mounting screws. Given the weight of the heater, the length of the screws should not be less than 5 cm In drilled holes in cement or epoxy resin insert wooden plugs, or plastic inserts. In the first case, in traffic drill bit with a diameter smaller than the diameter of screws, drilled holes in 2/3 of their length. Next, the screws are rolled and left to the complete setting of the cement or resin.
4
For reliability, you can provide a third screw, screw between the two already twisted and slightly below them. It should rely on its lower face the retaining plate of the heater. This option will prevent deflection of the mounting plate found on some types of water heaters. Screw can washer, it will more securely lock the edge of the plate.
5
Installed water heater must be located strictly vertically, but sometimes this can not be achieved because the mounting plate – tank heater is slightly tilted. In this case, is placed under the lower part on the wall, lined with dense rubber of the required thickness.