Instruction
1
First you need to open the casing of the system unit. For that end (if any) mounting screws, or detachable fastening. Then remove the cover. Unit power you can get from only one side, the other will interfere with the motherboard.
2
Then removed the unit power. It is usually fastened with four screws, which are unscrewed from the back side of the system unitand is supported on two curved plates of the hull.
3
To extract the unit power supply from the enclosure, disconnect the exhaust from it wires. Need to remove the connector from the motherboard, turn off hard (s) drives the actuator. All this is possible and not to do if you want to change the lubrication of the fansitting next to the system unit.
4
Next you need to remove the cover from the unit power supply. It is secured with four screws. Carefully remove cover so as not to damage the wires.
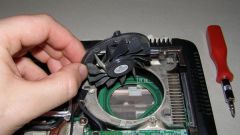
5
Unscrew the fan. He is also attached to the four screws on the cover of the unit power supply. Disconnect fan supply wire (either inside the unitor on the motherboard).
6
Remove the round sticker from the fan, but not discarded, as it will need to glue it back.
7
Gently with tweezers or other thin sharp object remove the plastic retaining ring.
8
Carefully, without bias, recoverable anchor fan unit power.
9
Remove old grease with a cotton swab and apply a new axle. Lubricant should be not too liquid not to flow out, but not too thick to prevent the rotation of the fan. Grease should not be much and it needs to be applied only on the axis.
10
Insert back anchor fanworn snap ring. You must make sure that the anchor is securely fixed.
11
Hermetically seal the sticker back. She needed to not leak and does not dry out the grease.
12
Fasten the fan back, plug it in, close the unit power supply cover and fasten it.
13
Put the block of food in place, fasten to the body of the system unit and plug it in.
Everything is ready, you've done it, you can turn on the computer.
Everything is ready, you've done it, you can turn on the computer.