
You will need
- Computer
- Microsoft Office Word 2007 (2003)
- The skills of the novice user
Instruction
1
An arbitrary diagram can be drawn using shapes, combining them with arrows and other special characters. Techniques for working with shapes.
Click on the "Shapes". Get a list of available objects. Select any one by clicking with the left mouse button. Then move the mouse pointer on the sheet. Instead the arrows will cross. Hold down the left mouse button and drag to draw the shape to the desired size.
Click on the "Shapes". Get a list of available objects. Select any one by clicking with the left mouse button. Then move the mouse pointer on the sheet. Instead the arrows will cross. Hold down the left mouse button and drag to draw the shape to the desired size.
2
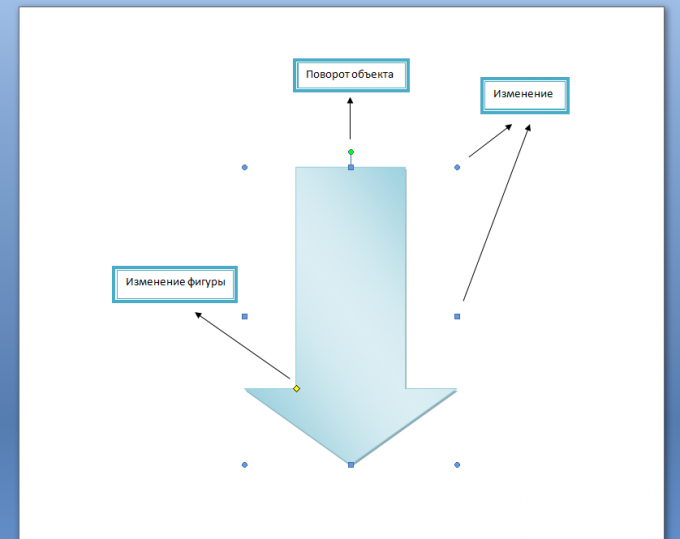
The figure size is adjusted using the blue dots contour. Hover over a point, it will turn into a bidirectional arrow. Hold down the left mouse button and drag the contour to the right or left. Using the green point on the upper boundary of the contour you can rotate the figure. Move the mouse pointer on the dot, twist displays a circular arrow. Move your mouse and bring the object to the desired position.
Some shapes have a yellow dot to change the shape (magnitude of the arrow, the length of the leader). Hover over it with the mouse pointer "hook" with the left button and drag.
Some shapes have a yellow dot to change the shape (magnitude of the arrow, the length of the leader). Hover over it with the mouse pointer "hook" with the left button and drag.
3
To move a shape, hover over it with your mouse pointer it will turn into a cross arrow, press the left button and drag the contour to the right place. To copy the shape, press and hold down the Ctrl key while left click dragging your object, then release the button.
To copy multiple shapes, first select them using the Ctrl key: press it and the mouse policythe the desired shape. With the text still highlighted, drag the group.
To copy multiple shapes, first select them using the Ctrl key: press it and the mouse policythe the desired shape. With the text still highlighted, drag the group.
4
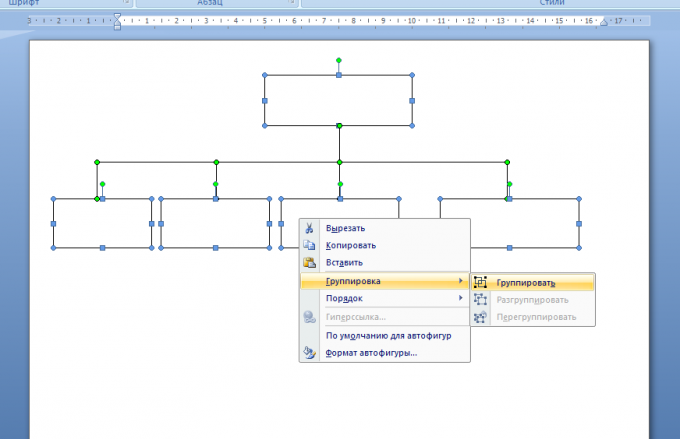
To lock multiple shapes to prevent accidental displacement, they should be grouped. Scroll to group by pressing Ctrl, as in paragraph 3. Then the selection, click with the right button, in context menu select "Group". If you wish to change the location of the pieces, Ungroup them: click on a group, right-click and from the menu select "Ungroup".
5
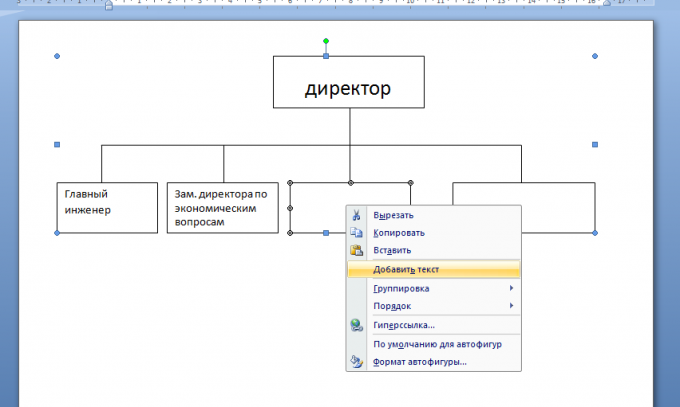
To enter text in a shape, click on it with right mouse button and from the context menu select "Add text".
6
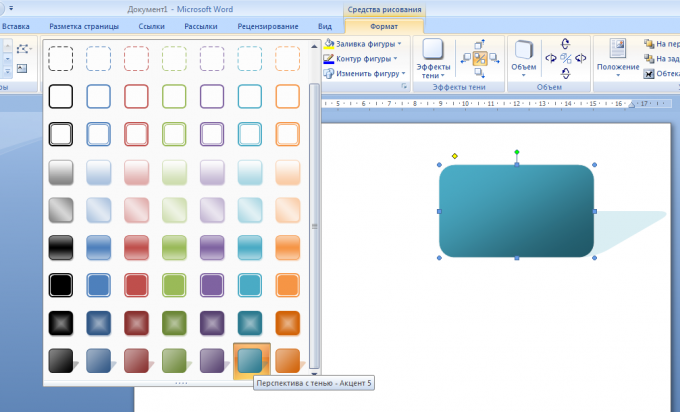
Immediately after inserting the shape in the ribbon tab opens the drawing Tools - Format. Apply to a selected object of the various options: color, size, shadow, outline – everything can be set manually.
7
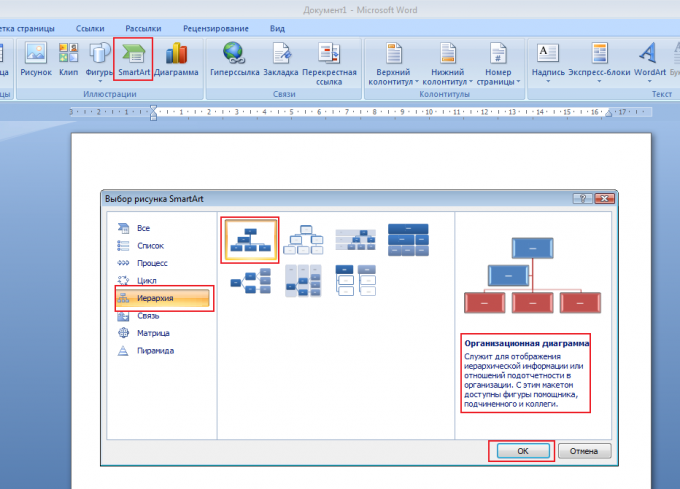
To create a schema you can also use SmartArt.
Techniques for working with SmartArt.
On the Insert tab, select SmartArt. Window opens select objects. In the left part of the window lists the types of schemes. At the center of this species, and any click-through appears on the right side. Since each type of object has its purpose, under the sketch is given a little explanation to make it easier to make a choice.
8
The most common and convenient layout to create a schema is a Hierarchy. Select the object and click OK. The worksheet will have a layout with multiple blocks arranged in a vertical hierarchy: the chief, assistant and three subordinates (who are "peers", that is, equal to each other).
9
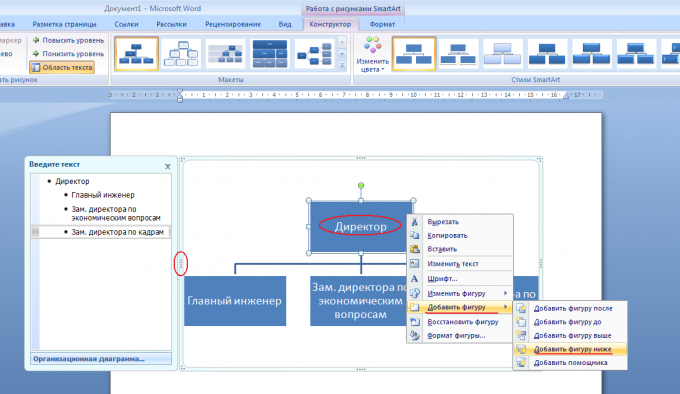
Units you can remove or add. To delete a block, click on it, then press Delete or Backspace.
To add a block, click with the right mouse button in the rectangle relative to which going to add. In the context menu select Add shape, and then narrow down exactly where: above or below, before or after
To add a block, click with the right mouse button in the rectangle relative to which going to add. In the context menu select Add shape, and then narrow down exactly where: above or below, before or after
10
To enter text in a block, just click on the word "Text" and start typing. The other way is typing in the text area. Locate the ledge on the left of the circuit diagram, click on it. Displays a bulleted list with a separate row for each unit.
11
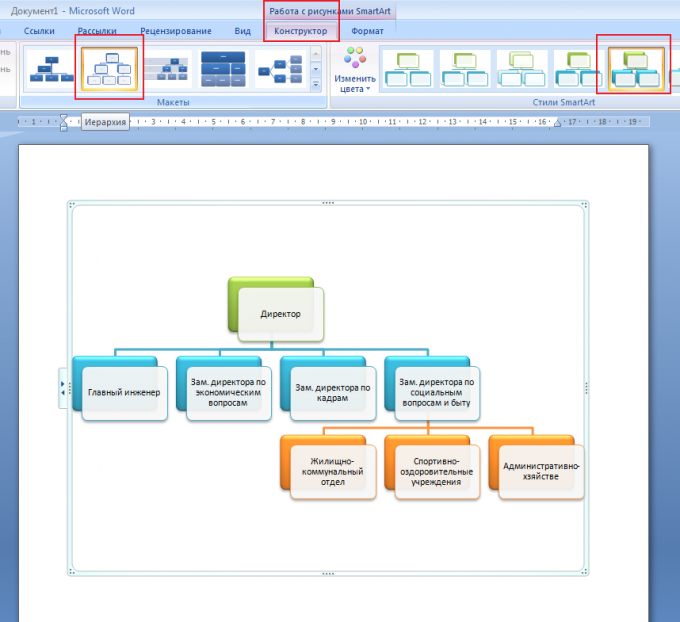
A menu of SmartArt offers a wide choice of elements of style. Immediately after inserting the object tab opens the Work with SmartArt. There you can customize the appearance, position in space, shadow, color, etc.
Note
This manual is designed for version 2007. In 2003, there is no SmartArt, and shapes are on the drawing toolbar, under the button "auto Shapes".
Search for organization chart on the Insert menu, Is a Schematic diagram.
Search for organization chart on the Insert menu, Is a Schematic diagram.
Useful advice
Before you begin charting on the computer, scribble it on a piece of paper. Consider the optimal layout of structural elements, while creating the schema not to make unnecessary movements.