Instruction
1
Run the GUI editor, and then load the desired picture.
2
Create a duplicate layer containing the original image. Copy layer by clicking the right mouse button on its row in the layers panel and selecting "duplicate layer", or simply pressing ctrl + j.
3
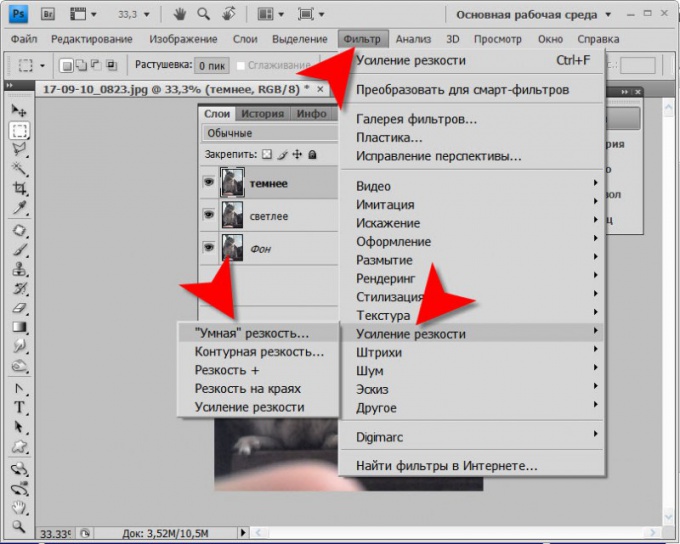
Open in Adobe Photoshop menu section Filter, and in this subsection "sharpening". Select "Smart sharpen..." - this paragraph reveals the version of the filter with the most complete set of options.
4
Check the box to "Advanced" to add to the main settings two tabs ("Light" and "Shadow") that contains the installer for the brightly-lit and shaded elements of the picture.
5
Pick the most effective settings on the tab "sharpening" by moving the sliders in the fields of "Effect" and "Radius". The impact of changes to the image quality control image preview in the same window. Check, how will it affect the sharpness of your photos by applying filters from the drop-down list "Delete".
6
Switch to the tab "Light" and using three sliders to adjust the settings on the tab "sharpening", for areas with enhanced brightness. Then do the same on the tab "Shadow" to dark areas.
7
Click OK, and the graphics editor applies the enhancement filter definition image to a layer with a duplicate of the uploaded photos.
8
Try alternatively to use other filters from the section "sharpening" - they use the same methods of sharpening, but have more narrow ranges of settings or only apply to certain areas of the photo. To do this, create another duplicate of the original layer, as described in the second step, and experiment with it. If necessary, this layer can be removed by right-clicking and selecting the menu item "Remove layer".
9
Save the photo with the changes. To call up the save dialog you can use the ctrl + s key combination. If you want to first optimize the image (to choose the optimal ratio between image quality and file size), use the combination shift + ctrl + alt + s.