Instruction
1
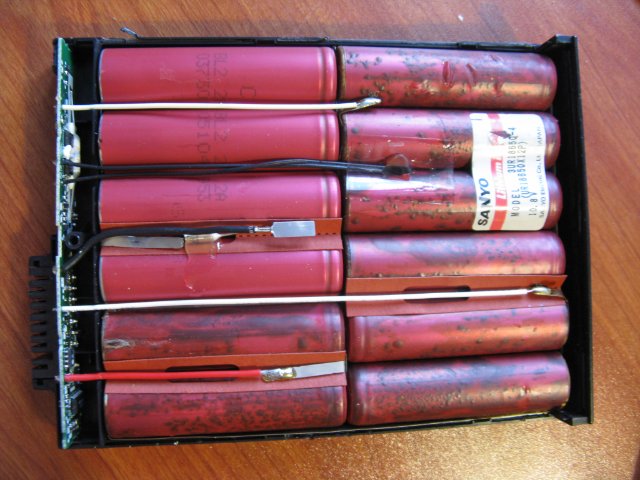
Before beginning of rehabilitation works it is necessary to remove the battery pack and carefully disassemble the plastic case. Inside are 4 pairs of elements. The elements in a pair are connected in parallel, the pairs themselves have a serial connection.
2
Be sure to connect the load to check the set of elements of the battery, and then check the voltage. The load use a regular automotive bulb with a power consumption of 20 watts.
3
Visually determine the intensity of the glow light bulbs in parallel and check the voltage with a DMM. The voltage of each pair should be of the order of 3.2-4.0 V. If the voltage is within these limits, it is necessary to repair the controller. This device provides a full control mode "charge-discharge" of the battery.
4
With a low rate need to check each item individually. First, unsolder the controller Board from the battery of the laptop ispre-sketched the wiring diagram. To determine the correct parameters of each element in the pair, you must separate each pair of elements by cutting the connecting metal strips on each side of the poles.
5
You will need a light bulb as a load element and a multimeter. Connected the bulb directly to the multimeter and take a voltage measurement on each element, which should be in the range of 1.7-2.0 V. Significant decrease of voltage or the lack of it, indicates the need to replace the defective item. After the diagnosis of the elements rejected not serviceable items, and serviceable, must be subjected to discharge by connecting a light bulb to them.
6
Next, you need to buy new items of the same type and make them discharge. If you do not do this procedure, the controller Board will be incorrectly determined charge level, a new set of elements.
7
After performing this operation and pripal all contacts and charge controller, you are ready to test the new battery with the controller, which must monitor the battery charge of the laptop from scratch.
Note
Attention! Ration to produce very carefully, in any case should not overheat the elements.