
Instruction
1
To change eye color in Adobe Photoshop, there are a variety of ways. One of them we will consider in this destruktsii.
Open the photo file.
Open the photo file.
2
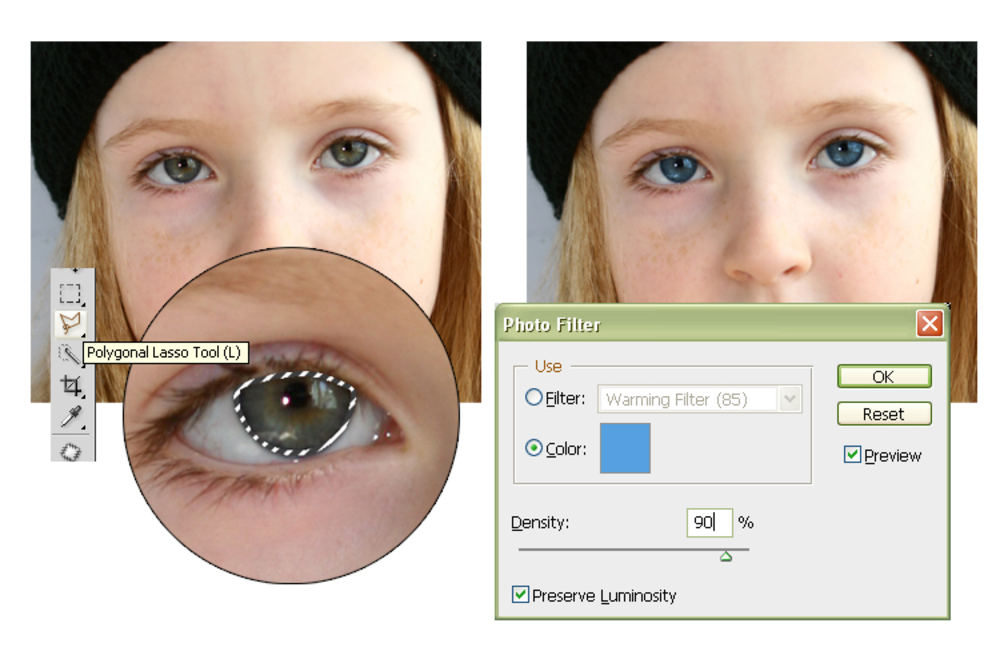
First we need to identify those areas which needs to be repainted. To do this, use the Polygonal Lasso tool. Setting the scale of the image so that it was easy to see the contours of the iris of the eye, we begin to trace them – build around the selected area of the polyline curve. The smaller segments of this polyline, the more accurate we will be able to approach the real contour of the photographed eye, but too granulate should not be too. If you accidentally put the top of the cut in the wrong place, can save the situation pressing "Backspace" which undoes the last action in building a circuit.
When the end of the curve will coincide with the beginning, the selection pane will close and the circuit will start to run shimmering dotted line. The allocation is finished. In principle, the preparatory phase is over and you can move through the steps of repainting, but as a rule, it is possible to see both eyes and change the color you must have both in the same way, if you over, do not try to achieve some fantastic special effects.
To the highlighted area to add another plot to the contour of the second eye, do some simple action: push the Shift key and the Lasso tool icon slightly changes its appearance, it appears a plus sign. And holding this key, we begin to build the second polyline in the second eye. After the first click setting the first peak – Shift can already be let go. Finish tracing the contour of the second eye, as we did with the first. Underlined area will be added to the result of the previous operation.
3
So, both eyes we have identified is around the iris of each of them flicker a contours. Now begin to change color. In the Arsenal of the program Photoshop many tools to do it. Use the Photo Filter tool (you can Find it in the menu Image>Adjustments> Photo Filter). In the window settings you can see two parameters that we need: this, first, the square by which we can set the necessary color. And secondly, is the engine responsible for the depth effect on the image. Switching color selection in manual mode by double-clicking on the field of colored squares, we set the required color tone. After that, visually monitoring the resulting image is a density effect.
Setting the engine to a value of 100% is likely to be fraught with an unnatural, overly solid color of the iris. In reality, a living person it has a fairly wide range of colors, deviating from the basic colours and comb all of them with the same brush" not worth it. Values of 75-85% is% usually sufficient to ensure that the color of the eyes was distinctly a shade, but the photo does not look fake.
Setting the engine to a value of 100% is likely to be fraught with an unnatural, overly solid color of the iris. In reality, a living person it has a fairly wide range of colors, deviating from the basic colours and comb all of them with the same brush" not worth it. Values of 75-85% is% usually sufficient to ensure that the color of the eyes was distinctly a shade, but the photo does not look fake.
4
To shimmering contours will not interfere with, remove selection with Ctrl+D. If you don't like it, you can cancel several latest operations via menu Edit>Step Backward (to step Back), and re-do the desired procedure by making reasonable adjustments.
5
If you are satisfied, save the image using the menu command File>Save As, typing a new name and a storage location of the pictures.