Instruction
1
Open the photo and copy the image to a new layer using Ctrl+J or command Layer via copy from the menu Layer ("Layer"). This is necessary to avoid damage to the failed correction.
2
In menu Filter ("Filter") select the Liquify tool ("Plastic"). Essentially, it is an independent image editor with its own toolbar and settings. To increase the portion of an image use the Zoom Tool (Magnifier) to zoom in, this tool combined with Alt. To move the image, choose the Hand tool (the Hand).
3
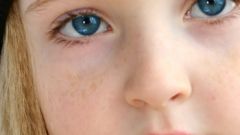
Before you can change the shape and size of the eyes, protect the region, which can deform as a result of your actions. On the toolbar, select the Freeze Mask Tool ("Freeze"). In the properties panel to the right of the image, set the brush size (Brush Size) and impact tool (Brush Density and Brush Pressure). The higher the value of these parameters, the stronger the protected region under the mask.
4
Paint pupils and iris. To remove mask, use the Thaw Mask Tool (Eraser). This tool can be invoked using shortcut key D.
5
Click on the toolbar Bloat Tool ("Swelling"). The size of the brush set is great just the iris. The value of Brush Density and Brush Pressure decrease it to 20, that the impact was accurate, and the result is natural.
6
Hover over the eye and click. Next, how the image. When the result suits you, click OK. Failed to undo action, click Reconstruct ("Cancel"). If you want to return to the original version, use the Restore All ("deselect all").
7
You can use the tool Push Left Tool ("Shift pixels"). If you stroke the object counterclockwise, it increases if clockwise – decreases. Install low values of the parameters of the Brush Density and Brush Pressure, the brush size – a little larger than the size of the iris. Draw a circle around the iris. Use the tool gently to achieve a natural result.