Instruction
1
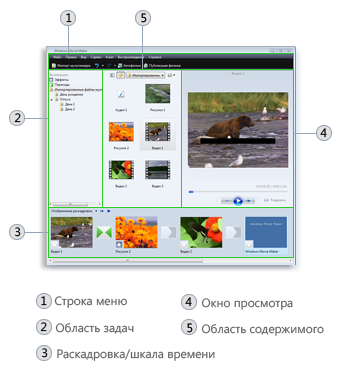
Windows Movie Maker is divided into several parts: the toolbar, the task pane (left), the timeline of the video viewport and the content area.
2
With the upper toolbar you can open the necessary files, save them to make the procedure of copy–paste and change the interface elements of the program. In the tasks pane, all the necessary functions available to the user when creating and publishing a movie. For example, to open a video file, use the menu "File" - "Open" or click "Import media".
3
Edit the project is in the storyboard or timeline. A storyboard is used to set the order of slides in the project and edit the desired transitions. You can insert the desired image or video into the project, simply dragging the file into the application area. To specify the desired transition effect click on the appropriate icon between slides and select the desired option.
4
In the dropdown menu "show storyboard" you can select "time Scale". With the left mouse button on this page, you can set the display duration of a frame, and add an audio track by replaying the audio file in this program area. To view the video you can by clicking on the button "Playback" at the top of the scale. Also in this menu is where you can add effects, transitions, and titles that can be added through the "Overlay name".
5
After finishing the program, you can save the project as a movie format .wmv or .avi. After publishing, you will be able to view these files like on your computer, and transfer it to other users, writing it to removable media or sending an e-mail. To save the project file select "File" - "Save as".