You will need
- - a safety support;
- - wheel chocks;
- - a set of keys;
- - chisel;
- - hammer;
- - Jack;
- - scrap;
- - capacity 5 liters.
Instruction
1
Install under the rear wheels stops, because the front part of the machine will have to raise. First loosen the wheel bolts, then lift up the left side. The front wheels should be at a height of not less than 10 inches off the ground. Install under the left side of the support, if not, then wooden stumps suitable. Do not substitute only under the machine the bricks or blocks as they can easily collapse under the weight of the car. The right side also lift and install under car support.
2
Remove the wheels and open the hood. Now you need to disconnect the battery and remove it so it doesn't interfere. Remove the air filter to get to the starter. Now remove the three nuts of fastening of a starter using the key 13. Can be disabled from the starter motor wires and remove from the car, but you can not disable it, just put it aside. But more convenient would be the first option. Now disconnect the ground wire from the transmission.
3
Remove the engine protection and more are located under the car. Disconnect the drive speed switch with key 13. Put under the frame and the engine support, since the next step is the removal of the cushions. On the box two of them, both must be removed. At the same time can Unscrew lower bolt fastening the gearbox to the engine and the nut from the side of the cabin. Use only the Allen wrench at 19. After that, the key 10 unlock the flywheel.
4
Remove the pins from the tie rod, remove nut. Using the puller for the steering ends, disconnect them from the stands. Also remove the two bolts on the ball joints. In the end, the rack should move freely on the drives. Now drain the oil out of the box. All drain is not necessary, enough to leave 1/3 of the total. Have to remove the right CV joint, so it can leak oil. With a crowbar, or hammer and chisel, remove the inner CV joint on the right side.
5
Alternately loosen the two upper bolts securing the box to the engine block. Instead, they need to install the bolts with the same thread, only 3-4 times longer. Perfect bolts to the lower control arm used on the classics. Now you only have to rip the box and slide it in the direction of the left wheel. And the checkpoint will fall on the side and fall on the transverse rod. Between the engine and frame are formed considerable gap through which easily changes the clutch disc, pressure plate, bearing.
6
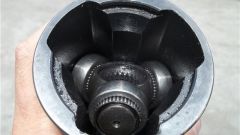
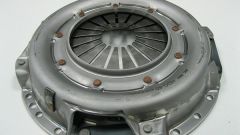
Remove the bolts securing the basket to the flywheel. Easier to do it up against the engine box through the hole for the starter. Only the key desirable to use mechanical gimbal. Spinning the flywheel, get rid of all the bolts. When the basket will drop onto the shaft, you need to push the box to the side. Through the hole, remove the disc, then a box. A little deeper let's dive and get the release bearing. Instead, immediately install the new one.
7
Put a CD on, and on top of it the basket on the flywheel. Ensure that the bolt holes matched. Loosely tighten a few bolts, then slide the box to the engine. The input shaft should enter the hole on the clutch plate, so the latter will have a hole to guide the screw driver in the right direction. Only after the input shaft entered the drive, you can tighten the clutch basket. This is done through the hole for the starter. And then begins the Assembly of the car in the reverse order.
Useful advice
In order not to drain the oil, you can extract the right constant velocity joint from the hub.