You will need
- Adobe Photoshop
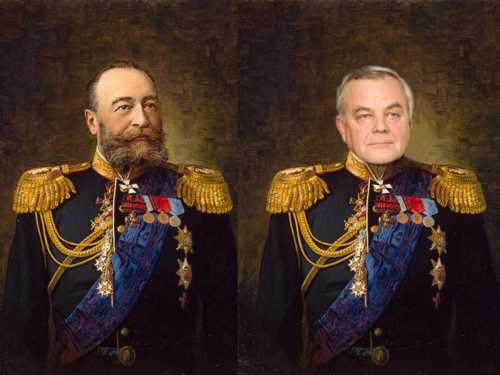
Instruction
1
Open two photos, from which you will collect a single image. Pick up the photo so that the people they were shown in similar proportions and scale, had about the same turn of the head similar in colour and light settings.
2
Start with a photo, from which you will carve the face and then paste. Circle the face the contour with a tool the Lasso Tool or the Rectangular Lasso Tool. Is not necessary that the stroke was the whole silhouette of a person, the main thing is to keep facial expressions and main features. Close the selection, click on it, right click and set Feather to 5 pixels. Then copy the selection to a new layer (Layer via copy).
3
Now open a second picture, where you will replace the human face with the new.
Create a new layer (Ctrl+Shift+N) and place the cut face from the first photo.
Open the Edit menu and select Free Transform. Resize the pasted face to proportionally fit the new object with a photo. You may have a little to narrow, it is possible to extend or tilt. Make sure that the facial features in new look look realistic and in proportion.
4
The color and texture of the skin in humans-of the original and the new faces did not differ from each other, use the commands color correction and change brightness. For a layer with an updated face select in the Layer menu, point to New Adjustment Layer, and Hue\Saturation. Tick the checkbox that appears the inscription " Use Previous Layer to Create Clipping Mask option and manually tweak the brightness and saturation of colors. For brightness correction, create a new layer in it and achieve the maximum naturalness of the image. Nobody has to guess that the face in the photo belongs to another man.
5
Make any last adjustments. Pick up the eraser (Eraser Tool), choose the appropriate size and softness, and then erase the area of the inserted face. Should remain only the major distinctive features, the form of the head remains the one on which you have inserted a new look.
6
If the picture you want to darken or lighten some areas on the face, use the Burn and Dodge tools.