You will need
- Four pictures width to 450px;
Instruction
1
This example will create a stylish page of the album with rotated photos.
I had prepared images (400px width) with addresses:
http://uanon.ucoz.ru/prosto/povorot/photo_1.jpg
http://uanon.ucoz.ru/prosto/povorot/photo_2.jpg
http://uanon.ucoz.ru/prosto/povorot/photo_3.jpg
http://uanon.ucoz.ru/prosto/povorot/photo_4.jpg
In the future we will give the images IDs (id) in accordance with their names.
2
For a start we will prepare the unit for our photo gallery using div tagand introduce the pictures using the img tag (each image must be enclosed in its own div tag), like so:


Please notethat we assigned the unit ID id="photo_page". ID will be able to turn to block using css.
Please notethat we assigned the unit ID id="photo_page". ID will be able to turn to block using css.
3
Next, you need to specify the block of css styles. List of styles: "position: relative;" - will set the origin of coordinates from the upper left corner of our block; "margin: 50px auto;" - will set the indent of our block "50px" at the top and bottom from the rest of the page content, and also sets automatic indentation right and left, thus aligning our block center; "width: 900px; height: 650px;" - will set a width of 900px and a height of 650px, respectively.
This list of styles should be placed in such a way:
#photo_page {
position: relative;
margin: 0 auto;
width: 900px;
height: 650px;
text-align: center;
}
Please note the use of "#photo_page" - so we turned to the block ID.
This list of styles should be placed in such a way:
#photo_page {
position: relative;
margin: 0 auto;
width: 900px;
height: 650px;
text-align: center;
}
Please note the use of "#photo_page" - so we turned to the block ID.
4
Now we set the General styles for each image inside a block photo_page. It has rounded corners, gray frame, white background, padding and shadow.
This will create the effect of photos:
#photo_page img{
border-radius: 7px;
border: 1px solid grey;
background: #ffffff;
padding: 10px;
box-shadow: 2px 2px 10px #697898;
}
Please note the use of "#photo_page img" - so we refer to all images inside the unit photo_page
This will create the effect of photos:
#photo_page img{
border-radius: 7px;
border: 1px solid grey;
background: #ffffff;
padding: 10px;
box-shadow: 2px 2px 10px #697898;
}
Please note the use of "#photo_page img" - so we refer to all images inside the unit photo_page
5
It is also important to finish such a short style:
#photo_page div {
float: left;
}
He draws all the blocks within the block photo_page to the left edge.
#photo_page div {
float: left;
}
He draws all the blocks within the block photo_page to the left edge.
6
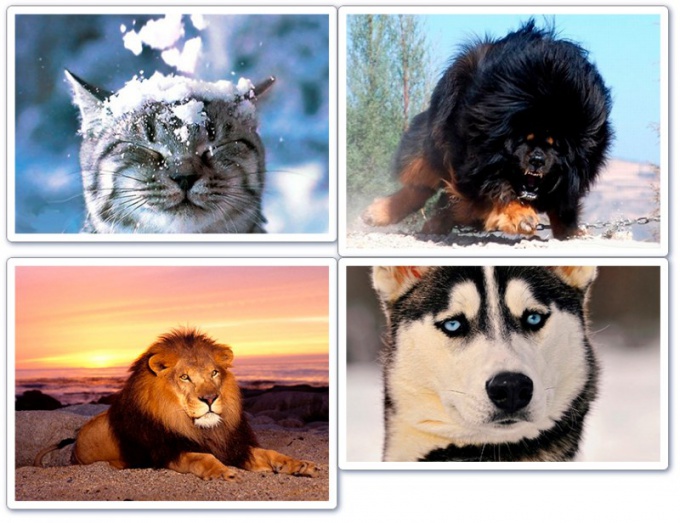
Now completed the intermediate stage of the lesson. If your work is similar to the image on the screenshot, then you have not made mistakes and can proceed to the next step.
7
Now turn-by-turn posted a photo. For this we need the style transform. At the moment in its pure form it is not used, and only with a prefix for each browser at the beginning, like so:
-webkit-transform: rotate(value);
-moz-transform: rotate(value);
-o-transform: rotate(value);
This rotation style for browsers: Google Chrome, Mazilla, Opera (respectively). Instead of the word "value" we will insert the number with the prefix deg at the end, like so:
90deg - turn-90 degrees clockwise.
-5deg is a rotation by 5 degrees counterclockwise.
And so on.
8
Style for photo photo_1:
#photo_1 {
-webkit-transform: rotate(5deg);
-moz-transform: rotate(5deg);
-o-transform: rotate(5deg);
}
The first image is rotated by 5 degrees.
#photo_1 {
-webkit-transform: rotate(5deg);
-moz-transform: rotate(5deg);
-o-transform: rotate(5deg);
}
The first image is rotated by 5 degrees.
9
Style for pictures photo_2:
#photo_2 {
-webkit-transform: rotate(-3deg);
-moz-transform: rotate(-3deg);
-o-transform: rotate(-3deg);
}
The second image is rotated -3 degrees.
#photo_2 {
-webkit-transform: rotate(-3deg);
-moz-transform: rotate(-3deg);
-o-transform: rotate(-3deg);
}
The second image is rotated -3 degrees.
10
Style for pictures photo_3:
#photo_3 {
-webkit-transform: rotate(-2deg);
-moz-transform: rotate(-2deg);
-o-transform: rotate(-2deg);
}
The third image is rotated -2 degrees.
#photo_3 {
-webkit-transform: rotate(-2deg);
-moz-transform: rotate(-2deg);
-o-transform: rotate(-2deg);
}
The third image is rotated -2 degrees.
11
Style for photo photo_4:
#photo_4 {
-webkit-transform: rotate(8deg);
-moz-transform: rotate(8deg);
-o-transform: rotate(8deg);
}
The fourth image is rotated by 8 degrees.
#photo_4 {
-webkit-transform: rotate(8deg);
-moz-transform: rotate(8deg);
-o-transform: rotate(8deg);
}
The fourth image is rotated by 8 degrees.
12
Consider how you can adjust the position of the images. For example, you want to shift the first image at 20px from the top and 10px from the left edge. In this case, you must use the style margin. Here is the correct version use it for our case:
#photo_1 {
margin: 20px -10px -20px 10px;
-webkit-transform: rotate(5deg);
-moz-transform: rotate(5deg);
-o-transform: rotate(5deg);
}
Please note, the first value of the style - top margin; the second is the indent to the right; thirdly, the bottom margin; the fourth indent to the left.
Important: in our case, the bottom margin to a negative value of the top margin. If on your page there is empty space under the image, please make an indent below it even more negative.
13
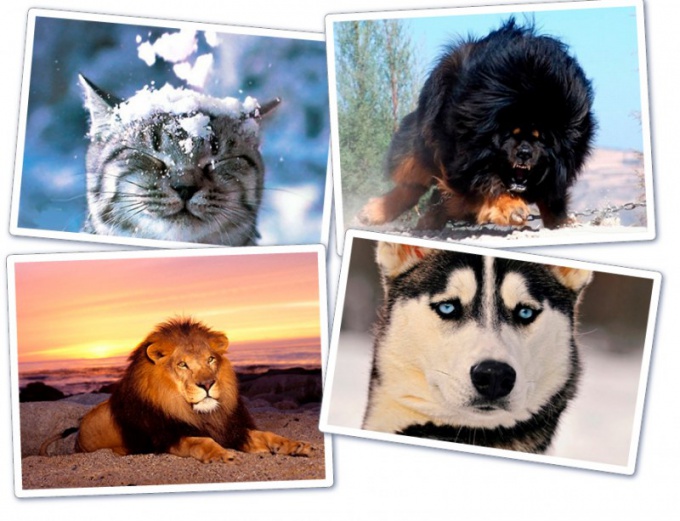
The work has been completed, I give a screenshot (subject to change indentation of the first image described in Step 12).
Build upon the style of indentation for any of the images, the position of which you are not satisfied.
Build upon the style of indentation for any of the images, the position of which you are not satisfied.
Note
You can also get acquainted with demomade for this lesson.
p.s. The indentation of the block above and below (50px) is also taken approximately, this value can be freely changed at their discretion.
p.s. The indentation of the block above and below (50px) is also taken approximately, this value can be freely changed at their discretion.
Useful advice
This example does not include work with absolute positioning of elements. Absolute positioning is useful if you are going to impose a very tight image, I advise you to read.