You will need
- - Arduino;
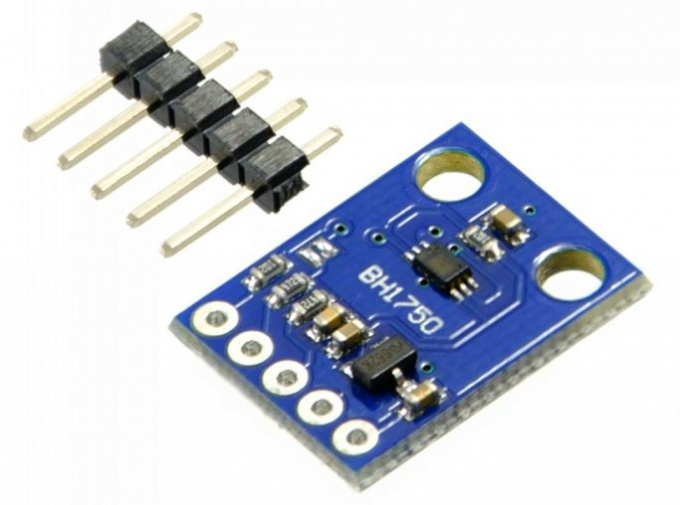
- module GY-302 digital light sensor BH1750;
- - a personal computer.
Instruction
1
Consider a module GY-302 BH1750 sensor. The BH1750 sensor is a digital 16-bit digital ambient light sensor that sets the range of measurements from 1 to 65535 Lux. The BH1750 sensor sensitive to visible light and virtually unaffected by infrared radiation, i.e. responds to the same spectral range as the human eye. As a consequence such sensors are widespread in today's electronic equipment, mobile devices, photo and video cameras, in systems of "smart house" and many others.
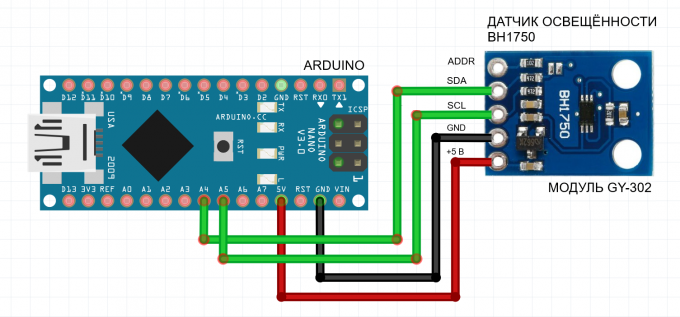
The connection module is two-wire I2C interface, while powered from +5 volts. The I2C interface is implemented in the Arduino analog pins A4 and A5, which are responsible for SDA (data bus) and SCL (bus clock), respectively. Output ADDR of module GY-302 can be left unconnected or connected to ground.
The connection module is two-wire I2C interface, while powered from +5 volts. The I2C interface is implemented in the Arduino analog pins A4 and A5, which are responsible for SDA (data bus) and SCL (bus clock), respectively. Output ADDR of module GY-302 can be left unconnected or connected to ground.
2
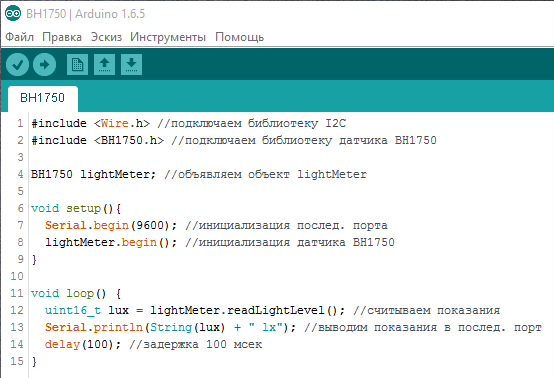
We will not delve into the details of the implementation of the interface sensor BH1750 Arduino, and use a ready-made library. You can download it here: https://github.com/claws/BH1750/archive/master.zip. The downloaded archive unpack it to the directory the IDE "Arduino IDE/libraries".
Write here is a sketch and upload it to your Arduino. In the sketch we every 100 milliseconds read out from the sensor BH1750 readings of illumination in the suites and bring this data to the serial port.
Write here is a sketch and upload it to your Arduino. In the sketch we every 100 milliseconds read out from the sensor BH1750 readings of illumination in the suites and bring this data to the serial port.
3
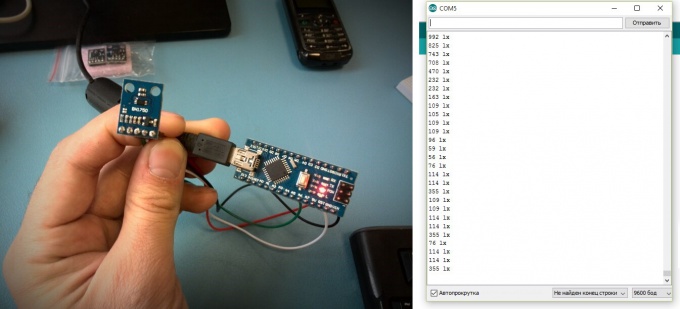
Connect the light sensor BH1750 Arduino according to the diagram above. Connect your Arduino Board the Arduino Board to the computer. Start the development environment the Arduino IDE and open the serial port monitor by "Ctrl+Shift+M" or via the menu "Tools". To monitor the serial port will run luminance values from our sensor BH1750. Aim the sensor at the light source, then close it from the light and you will see how changing the statement.