With decoupage, you can decorate the entire surface of the Shoe, or only some parts - the heel, platform, wedge or one side of the shoes. It all depends on your creative concept and look of your shoes. The latter can be made of different materials (suede, leather or textile), but it should not have a lacquered surface.
The methods of transformation of shoes in this technique:
- decoupage paper or napkins;
- decoupage with fabric.
Beginners and those who prefer the simplicity and ease of execution, is more suitable napkin technique.
To make decoupage shoes for napkin technique, you'll need:
old, worn shoes;
- napkin for decoupage;
- scissors;
- glue (for decoupage or PVA);
- wide flat brush with synthetic bristles;
- a cotton ball or swab;
- a means for washing Windows;
Polish with a water-repellent effect.
First, prepare your shoes: clean it, wash and dry. Choose a napkin with a pattern that is suitable for your idea. For more effective results it is worth considering the following: the lower draw surface is, the smaller should be the pattern.
Cut out the image very carefully, without errors, otherwise all the flaws will be noticeable on the shoes. Large picture cut out in stages, with the individual elements. Cut out the image split into layers.
Usually, the napkin has 4-5 layers. Should all unnecessary to separate, leave one (top) with the painted surface, as for decoupage shoes must be used very thin paper.
Now attach the sticker to the surface of the Shoe, and the top gently brush on the glue in several layers, from the center of the image toward the edges. Thanks to this, the napkin evenly smoothed, will not break and will not be rolled up.
When the layers of glue is well dry, proceed to the final stage of work. Remove adhesive residue with cotton swab dipped in cleaner Windows. If you have found a defect (that is, the damaged picture), seal it with another layer of paper cut-out model of the image element.
To decorated shoes have become more durable after drying, the adhesive and correction of flaws, you need to secure all work with lacquer. For easier application you can use this tool in an aerosol spray can. The paint is applied in 3-4 layers, with each layer must be completely dry.
If the work done is you like, you can also make decoupage handbags, then you will get a unique kit.
The following method - fabric decoupage shoes. You will need:
- a pair of old shoes;
- fabric (for the first time, you can use a conventional cotton);
- self-adhesive fabric (tracing paper) or fabric for sewing patterns;
glue;
pencil;
- alcohol;
- a cloth for cleansing the shoes;
- scissors;
Polish for shoes.
In the first place should be divided into the shoes section. You will be much easier to work with small fabric pieces than one whole piece. In addition, it will allow you to stick the fabric very carefully so that the updated shoes aesthetic appearance. With a solid piece of fabric makes this virtually impossible.
So, divide each Shoe into 5 sections: wedge; toe; inner side from the center to the heel; the inner side from centre back; hand to toe.
In the next step you will need fabric for the pattern (tracing). For convenience, it is desirable to use a special adhesive paper or fabric. If it is not, take the glue and paper to make the proper contours of the patterns for each section.
Making the pattern, transfer it to the underlying material. In the process leave from the contour pattern 1 inch for allowances, as the shoes has a convex shape, and the material should completely cover the entire surface. Then carefully trim the excess fabric.
It is worth noting that the first time it is better to use material with a simple pattern. If you have sewing skills, you will be easy to connect each piece of fabric to the result of the inextricable pattern.
Clean shoes from dust and degrease the surface with alcohol. Then apply glue to the side of the Central part of the shoes and carefully attach material. Try as much as possible to be tightly pressed against the fabric and ironed it at the same time to avoid bubbles and folds.
The edges of the protruding fabric tuck inside. As soon as the material will be pasted at the base of the sole, trim the unnecessary parts and tuck, making the seam and smoothing it carefully. Once you get to the area of the sock, tuck the fabric. In result, you will have folds, which must firmly.
Plastered shoes cloth, wait until the glue dries, the fabric tightly to the surface. To protect the material from damage, cover the entire surface of the Shoe varnish matte shade.
The methods of transformation of shoes in this technique:
- decoupage paper or napkins;
- decoupage with fabric.
Beginners and those who prefer the simplicity and ease of execution, is more suitable napkin technique.
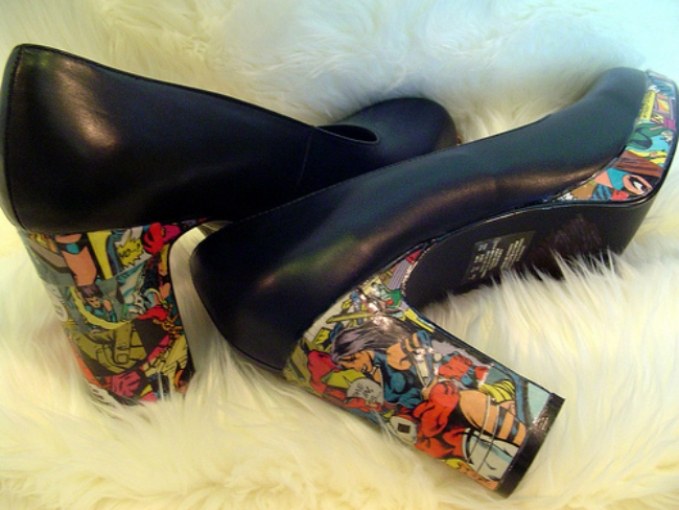
Decoupage shoes: fashion 1
To make decoupage shoes for napkin technique, you'll need:
old, worn shoes;
- napkin for decoupage;
- scissors;
- glue (for decoupage or PVA);
- wide flat brush with synthetic bristles;
- a cotton ball or swab;
- a means for washing Windows;
Polish with a water-repellent effect.
First, prepare your shoes: clean it, wash and dry. Choose a napkin with a pattern that is suitable for your idea. For more effective results it is worth considering the following: the lower draw surface is, the smaller should be the pattern.
Cut out the image very carefully, without errors, otherwise all the flaws will be noticeable on the shoes. Large picture cut out in stages, with the individual elements. Cut out the image split into layers.
Usually, the napkin has 4-5 layers. Should all unnecessary to separate, leave one (top) with the painted surface, as for decoupage shoes must be used very thin paper.
Now attach the sticker to the surface of the Shoe, and the top gently brush on the glue in several layers, from the center of the image toward the edges. Thanks to this, the napkin evenly smoothed, will not break and will not be rolled up.
When the layers of glue is well dry, proceed to the final stage of work. Remove adhesive residue with cotton swab dipped in cleaner Windows. If you have found a defect (that is, the damaged picture), seal it with another layer of paper cut-out model of the image element.
To decorated shoes have become more durable after drying, the adhesive and correction of flaws, you need to secure all work with lacquer. For easier application you can use this tool in an aerosol spray can. The paint is applied in 3-4 layers, with each layer must be completely dry.
If the work done is you like, you can also make decoupage handbags, then you will get a unique kit.
Decoupage shoes: fashion 2
The following method - fabric decoupage shoes. You will need:
- a pair of old shoes;
- fabric (for the first time, you can use a conventional cotton);
- self-adhesive fabric (tracing paper) or fabric for sewing patterns;
glue;
pencil;
- alcohol;
- a cloth for cleansing the shoes;
- scissors;
Polish for shoes.
In the first place should be divided into the shoes section. You will be much easier to work with small fabric pieces than one whole piece. In addition, it will allow you to stick the fabric very carefully so that the updated shoes aesthetic appearance. With a solid piece of fabric makes this virtually impossible.
So, divide each Shoe into 5 sections: wedge; toe; inner side from the center to the heel; the inner side from centre back; hand to toe.
In the next step you will need fabric for the pattern (tracing). For convenience, it is desirable to use a special adhesive paper or fabric. If it is not, take the glue and paper to make the proper contours of the patterns for each section.
Making the pattern, transfer it to the underlying material. In the process leave from the contour pattern 1 inch for allowances, as the shoes has a convex shape, and the material should completely cover the entire surface. Then carefully trim the excess fabric.
It is worth noting that the first time it is better to use material with a simple pattern. If you have sewing skills, you will be easy to connect each piece of fabric to the result of the inextricable pattern.
Clean shoes from dust and degrease the surface with alcohol. Then apply glue to the side of the Central part of the shoes and carefully attach material. Try as much as possible to be tightly pressed against the fabric and ironed it at the same time to avoid bubbles and folds.
The edges of the protruding fabric tuck inside. As soon as the material will be pasted at the base of the sole, trim the unnecessary parts and tuck, making the seam and smoothing it carefully. Once you get to the area of the sock, tuck the fabric. In result, you will have folds, which must firmly.
Plastered shoes cloth, wait until the glue dries, the fabric tightly to the surface. To protect the material from damage, cover the entire surface of the Shoe varnish matte shade.