You will need
- screwdriver
Instruction
1
The causes can be many: clogged/dried up print head, you need to clean the paper sensor, check the feed mechanism and move the print head to remove foreign objects wedging device. The design of most of the printers similar, especially if we consider the model of one company and one line.
2
First, you must move the printhead to the Parking area (for devices with inkjet printing).
3
Then open the lid and remove the cartridges.
4
Next, disconnect the device from the network and proceed with the dismantling of the housing.
5
Disconnect the auxiliary panel for the direction of the paper. Pick up the screwdriver and Unscrew the screws that secure the outer plastic panel.
6
Then remove the control Board. To do this, Unscrew the screws that it is secured to the frame of the printer, and unplug it going to the wire.
7
Next remove the screws that secure the base frame, and remove it to the side.
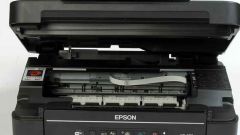
8
Then going to disconnect the printhead cables and remove it from the rails.
9
All device nodes become available. In this General phase the fight is over. Further all depends on specific fault models and a printer.
10
Assembly is done in reverse order. Assembly/disassembly is carried out with extreme caution, so as not to damage the many sensors. Otherwise the work done may be not only useless, but can cause irreparable damage to the already defective printer.