You will need
- Cotton fabric
- The Hoop
- Threads "Muline"
- Cotton bobbin thread
- A needle with a wide eye
- Pencil
- Ballpoint pen
- Tracing
- Copy paper
Instruction
1
Put the drawing on tracing paper. Lay the ironed fabric on the table face up. Put on her sheet of transfer paper, then tracing paper with the drawing. Trace the pattern with a ballpoint pen. Remove the tracing paper and carbon paper.
2
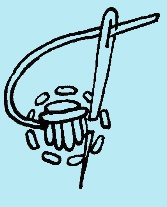
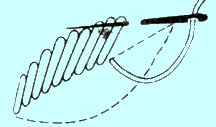
Pull the fabric in the Hoop. Pass the needle thread floss 1 addition and panel the elements of the picture seam "forward needle". Sew the outline pattern stitches gladeville. The stitches should fit snugly to each other. When performing unilateral surface stitches on the front side to be long and straight. They are so. Bring the needle on the front side. Pull the thread to make a long straight stitch from one edge element to another. Enter the needle, pull thread to wrong side. Enter the needle from the inside at a distance of 1-2 threads from the previous puncture, pull out the thread on the front side.
On the reverse side you get a point on the contour of the figure. On the reverse side, the needle is introduced at a distance of one or two strands of the previous stitch strictly on the contour lines. For two-sided surface stitches on both sides will be the same. After completing the first stitch on the front side in the same way as with one-sided surface, pull the thread on the reverse side to where you began the first stitch, enter the needle close. Pull the thread on the front side.
On the reverse side you get a point on the contour of the figure. On the reverse side, the needle is introduced at a distance of one or two strands of the previous stitch strictly on the contour lines. For two-sided surface stitches on both sides will be the same. After completing the first stitch on the front side in the same way as with one-sided surface, pull the thread on the reverse side to where you began the first stitch, enter the needle close. Pull the thread on the front side.
3
Do the flooring. To do this, take a cotton bobbin thread and sew the element of the pattern of parallel lines, seam "forward needle". The direction of the lines must be perpendicular to the arrangement of surface stitches. Then embroider the picture element main thread.

4
Try to embroider the most common elements of surface. For "cuppy cake" use any element of the pattern circle. Sew the circle to the contour of the seam "forward needle". Make flooring. The flooring gladeview embroider stitches. Similarly, running "leaf". In embroidery this item is necessary to consider that the flooring is laid lengthways, and basic stitches across the element. If you perform "a leaf in split", then you start to embroider it exactly the same way as a simple leaf. In place of split leaf make two parallel stitch. Flooring and surface fill the whole first part of the leaf. Then fill first one part of the leaf. Punctures do between the parallel stitches.

5
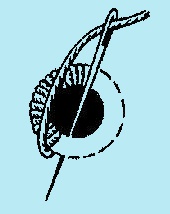
Embroider "the hole". For this you will need an awl and cotton thread. Pierce the fabric hole. Frayed edges cotton thread. The implementation of the "flower" starts with holes. After you do her and armetale, embroider flower petals the same way you embroidered the "cuppy cake".

Note
Before you start embroidery stitch, it is recommended to learn a few simple decorative stitches - "forward needle", "back needle" stitch, stalk-like, "nodules". The first two needed to actually stitch embroidery, the other for otdelnyh elements.
Stitch can embroider without Hoop in if you are already proficient in the technique of embroidery and fulfill the product, which is difficult to pull on the hoops.
Knots on the wrong side should not be. With one-sided surface of the end of the thread is hiding on the front side under the embroidery.
If you are going to embroider multi-color satin stitch, the pattern elements obselite different colors.
The flooring is mostly white surface. But you can apply this method for the multicolor embroidery. The image is more three-dimensional.
Useful advice
Fabric you can use any. But if you are just starting to embroider, it is better to take cotton fabric.
The Hoop is better to take large. They can be wooden, metal or plastic. Very convenient plastic Hoop, because they allow you to adjust the tension of the fabric by means of a special clamp.
If the fabric is badly stretched on a wooden Hoop, it is necessary to wrap them with the same fabric.
In embroidery on thick fabrics the picture can be applied without carbon paper. Baste the tracing paper to the fabric from the front side. Paste the whole design in the Hoop sew a line along the contour. Then remove the tracing paper.
For embroidery on translucent fabrics, you can use a back stitch. Panel contour seam "back needle". Stitches should be small. Making the first stitch, loop the thread on the reverse side to the other edge of the picture. This will work exactly the same stitch. Enter the needle near the first puncture. On the wrong side it turns out the intertwining threads. This method is perfect for decorating curtains.
If the image is large, do not make long stitches. It is better to perform a few rows of short stitches.
When performing multicolor patterns, a needle and thread of a different color should not enter into the stitch, and between adjacent stitches. The transition will be more smooth.
Embroidering colored surface without flooring, use slant stitches.
