You will need
- - Adobe Photoshop;
- - the original image.
Instruction
1
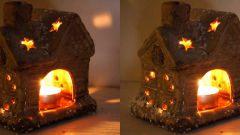
Load the Adobe Photoshop image that has a glow. On your keyboard press Ctrl+O or in the main menu, select "Open..." section of the File. A dialog box will appear. Go to the directory with the image file. Select it in the listing. Click "Open".
2
Start a new adjustment layer to align the brightness and contrast of the illuminated fragment. In the main menu, select Layer, New Adjustment Layer "Brightness/Contrast...". Displays the New Layer dialog. Select the value of the parameter Opacity 100% and select None and Normal in Color and Mode lists, respectively. Optionally, type a layer name in the Name field. Press the OK button.
3
Create an adjustment layer. After you complete the steps in the previous step a dialog will appear Brightness/Contrast. Activate the option Preview. Using the sliders or by entering values in the appropriate text boxes modify the values of the parameters Brightness (brightness) and Contrast (contrast). Control the degree of reduction of the area of glare. Get at least a partial effect. In the process of selection of parameters of the whole area of the image will become darker. Do not pay attention to it. Work only on sight. Press the OK button. The system will automatically switch on an adjustment layer.
4
Fill the layer mask with black. Activate The Paint Bucket Tool. Set the black foreground color. Click anywhere in the picture. The image in the document window changes to the original.
5
Return the action of the adjustment layer in the desired areas. As foreground color set white. Activate the Brush tool. Choose a brush with soft edges suitable diameter. The opacity parameter (Opacity) set to around 5-10%. Handle brush different areas of glare to achieve the desired effect. If left too bright areas, repeat steps 2-5 as needed.
6
Save the adjusted image to a file. Select "Save As..." section in the File main menu or press Ctrl+Shift+S on the keyboard. Set the target format, the file name and the directory in which it is placed. Click "Save".