Instruction
1
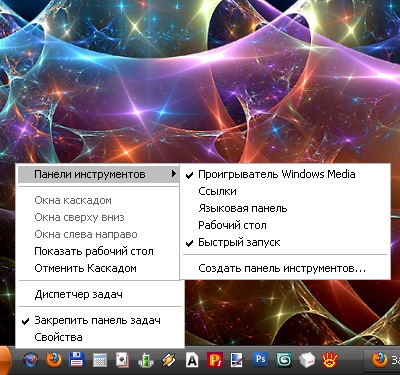
Move the mouse cursor to the bottom edge of the screen and click on the taskbar on any blank area right click. In the drop-down menu with the left mouse button click on "lock the taskbar" to remove the marker. Place the cursor on any blank area of the taskbar, click the left mouse button. Holding it down, move the bar to the left, right, or top edge of the screen. Again click on the panel, right-click and from the drop down menu, place the marker next to "lock the taskbar".
2
To "hide" the task bar, click the right mouse button and from the drop down menu, select "Properties" or click the toolbar with the left mouse button and press Alt and Enter. If you can not call the properties window of the taskbar from the desktop through the start menu, select "control Panel" and click the "task Bar and start menu" in the category "appearance and themes". In the properties window, click the tab "task Bar" and set the marker in the field "auto-hide the task bar". Click "Apply" and close the window.
3
To add the quick launch bar application, right-click on the taskbar and select the submenu "toolbars" string "Quick launch". Set the marker in front of the item. Install the mouse cursor on the icon of the app you want to add to the quick launch toolbar. Hold down the left mouse button, drag the icon to the panel. A new icon on the desktop then you can remove. If the quick launch is not enough space to display all the desired icons, remove the token from the item "lock the taskbar" and adjust with the mouse the size of the quick launch. After – re-attach the control panel.
