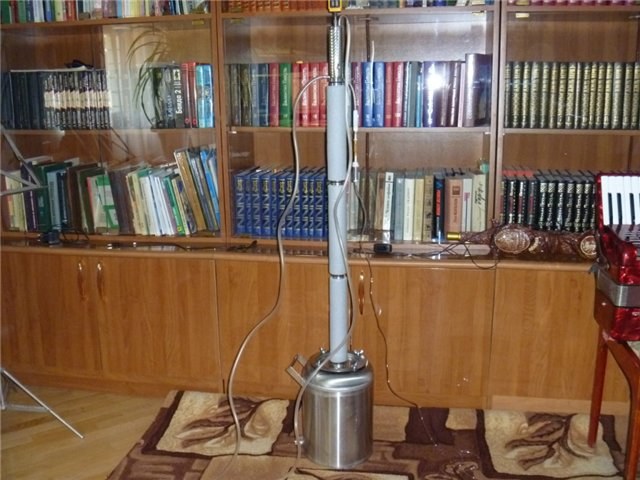
You will need
- - stainless steel tube with a diameter from 30 to 50 mm and a length of 120-150 cm, with a minimum wall thickness (optimally 0.7 - 1 mm);
- - thermos for making reflux condenser with a volume of 0.5-0.75 liters;
- - adapter for connection of pipes with lid Cuba and with the dephlegmator;
- - insulation for thermal insulation of the Packed portion of the column;
- - a piece of sheet steel for the manufacture of the support washers;
- - a tube with a diameter of 4-6 mm, for the manufacture of taps for water and the fridge;
- a piece of Teflon sleeve for thermometer;
- - electric drill;
- - drill bits of different diameters;
- - emery machine or attachment to the electric drill;
- - pliers;
- - hammer;
- - sandpaper;
- - the file;
- - electric soldering iron with a power of 100 W;
- - gas burner;
- - solder, flux (soldering acid);
- thermometer;
- - flexible tube or hose length 5-6 inches;
- - adapter for valves.
Instruction
1
Take the pipe to the lathe in order to cut a piece of pipe of the required length, removed the chamfer and attornevs region.
2
Fabricate an adapter that will connect the pipe with the lid of the device and node selection of the distillate. On the one hand the adapter has to be tightly inserted into the pipe, and on the other hand it should have a thread step of 1.5-2 mm.
3
Manufacture of bearing washer for attachment. Their diameter shall provide snug fit to the tube, their openings have a diameter of 3-4 mm. Insert one side of the pipe one goal. At the point of attachment of the tube to the cube, solder the adapter, pre-cleaning the soldering. Insert the tinned adapter into the pipe and heat the soldering gas torch.
4
Manufacture the nozzles to the column. Fill nozzle into the tube and shake the tube for uniform styling nozzles. Tube must be filled to the top nozzles.
5
Insert the pipe support washer for the nozzle. Then insert the tinned end of the selection, heat the place of soldering. Put them on pipe insulator.
6
Proceed with disassembly of the thermos. Scrape the bottom of the thermos sandpaper and saladita bare place. Made of sheet metal bracket and steel wire – loop. Insert the loop into the hole in the bracket and twist them with pliers.
7
The free end of the wire clamp in a vise and nail to the wall. Both hands take a thermos and tug sharply. The bottom of the thermos is supposed to fly.
8
Undercut the perimeter of the welded seam, which connects the lid and the jug. This procedure need to finish in that case when between the lid and the flask appears a small gap around the perimeter. Remove the inner flask from the external.
9
Make a dephlegmator. To do this, remove the bottom cover and vacuum. In the inner bulb drill a hole in the center of the back side of the flask to ensure air access inside. Type saladita place of the hole and insert the pipe. Sealed pipe in the hole. In the center of the bottom of the thermos drill another hole and put the bottom on the flask. Propagte the tube and the bottom of the thermos.
10
Will saludito the neck of the flask, and node selection. In the neck insert the node selection and solder it. For tube removal and supply cooling water, make holes at the top and bottom of the outer flask thermos. Insert the tube and propagte the joints. For sleeve thermometer drill a hole in the node selection of the distillate. In the bushing, drill a hole diameter probe thermometer, insert the grommet and knot selection.
11
Rinse all the soldering joints with a solution of baking soda in water. Screw the reflux to the column and rinse under running water.
Note
Spend all of the mechanical actions in a protective mask and gloves. Strictly observe safety precautions during the manufacturing process of the distillation column.
Useful advice
During the filling nozzles in the pipe cannot be too much the pipe shake as nozzles can pop out of the pipe. If the first attempt fails to remove the bottom of the thermos, it is necessary to increase the contact area of the bottom and clamps and try again.